AdAdmin
Your easy ad server system.
Documentation
ver 4.2
Software available on CodeCanyon:
https://1.envato.market/adadmin
INDEX
File installation and permission
Config the database connection and run database installation
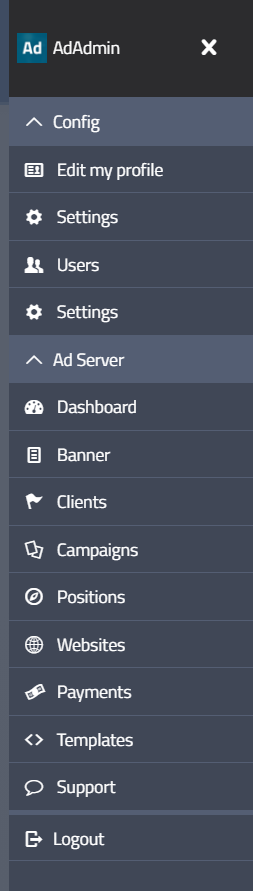
3 Menu commands and user profiles explained
The banners dashboard (banners list)
Creating a banner as an Administrator
Creating a simple banner with a JPG / GIF / PNG image
Creating a responsive banner with 2 images and Templates
Creating an HTML5 banner (ZIP)
Creating a banner with a script (such as Google Adsense)
Show data collected and reports
Template tool to create scripted banners
Add an advertiser user to a client
7 Selling process with Advertisers
EXTERNAL LOGIN - Integrate AdAdmin login
14 Next features, TO DO planning
13 HOW TO UPDATE THE SOFTWARE TO LAST VERSION
AdAdmin is an ad-server, a software that manages ads on websites.
It can be used in different scenarios:
With AdAdmin you can manage users (webmasters and advertisers) and banners made with GIF, JPG, PNG, or HTML5, or external scripts (such as Google Adsense). HTML5 banners can contain videos. You can create different positions and manage multiple banners on each position, which are automatically rotated.
Here is a full list of the features:
This software has been tested on servers with over 1 Million users each month! It’s optimized!
You can download the AdAdmin software from CodeCanyon:
https://1.envato.market/adadmin
Linux server with php (not tested on windows server, it should work too).
AdAdmin is tested with php 7.3 and 8.0
Depending on your server configuration you could need to chmod some directories to set write permissions.
MYSQL is tested with version 5.6.
You can unzip the AdAdmin zip file on the root of your server preserving the subfolder named “amb”, which contains all the files. You can rename the amb folder to match your poreferred address, but it is better to not use “ad” or “banner” strings in the url to prevent adblocking software.
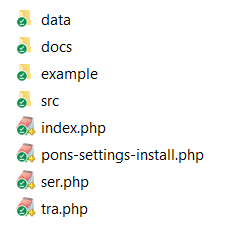
So you have your root, and then “amb” folder with these files:
Remember to CHMOD 777 or 755 (it depends on your server configurations) these directories (must be writable, php user must be able to create, edit and delete files):
/amb/data/logs
/amb/data/dbimg
/amb/data/geoip
And this file:
/amb/pons-settings-install.php
If these folders/files are not writable, please manually CHMOD 755 or CHMOD 777 those directories.
After unzipping the file go to the browser and load www.yourdomain.com/yourfolder, if your domain is www.test.com and you have placed everything in the /amb folder put this address in the browser:
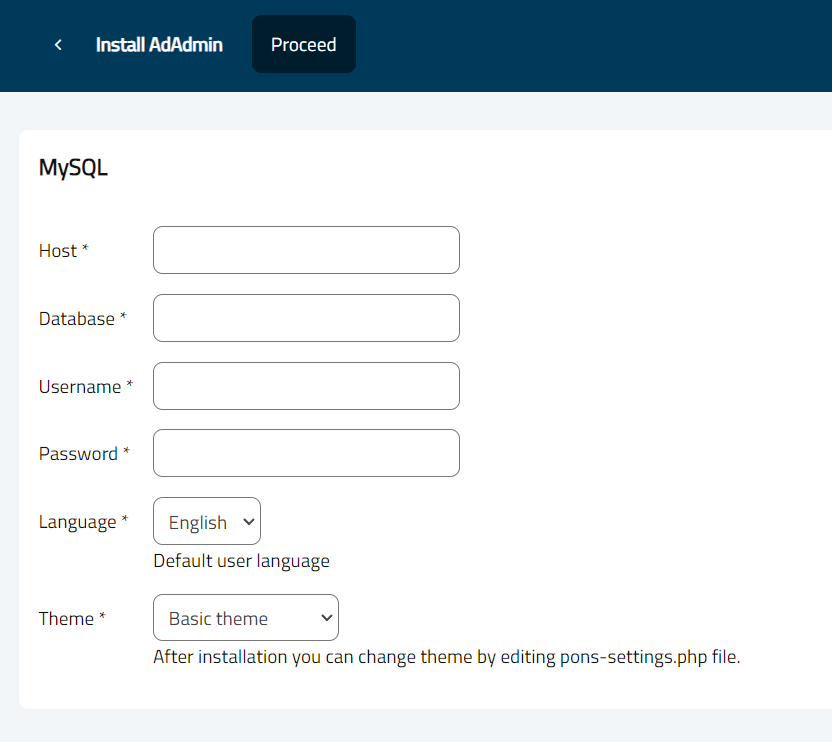
This will load this page:
Insert your db data and click on “Proceed”. This script will insert data in the pons.settings.php file. If everything works fine you will be redirected to the login page.
We have automatically created some banners, positions, campaings and clients to start with a working set like in our demo. There are also three users:
user: admin ADMINISTATOR
pwd: admin
user: aaa ADVERTISER
pwd: aaa
user: www WEBMASTER
pwd: www
After the first login navigate to Config > Settings as admin and set up the variables needed:
default is AdAdmin, you can change as you want
An ad server works by serving ads, this job is done with a group of javascripts (one for each banner position) to be placed in your site. The javascript calls the AdAdmin server and shows the banner, tracks the impressions and the clicks.
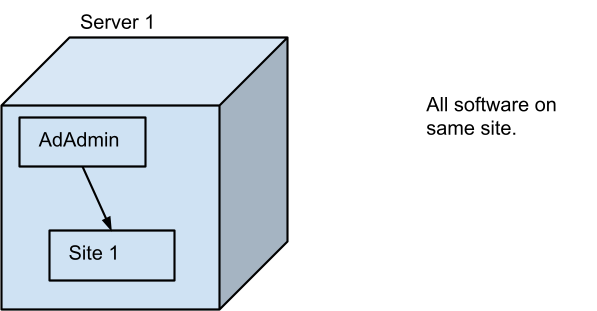
The AdAdmin software lets you serve banners to many sites or just one if you want.
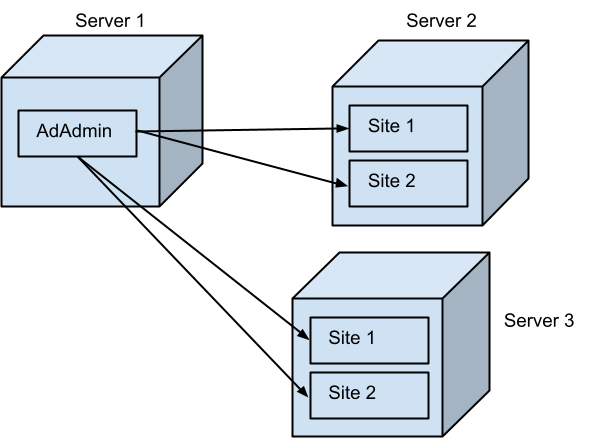
You can place AdAdmin on a server and deliver banners to sites on other servers, or put the AdAdmin on the same web site where your site is (it can coexist with CMS like Wordpress):
Or on a different server and deliver banners to many sites:
The AdAdmin software works by defining “Positions”. Each “Position” is a banner position on a site and when you create a “Banner” you have to specify which position it will use. If you add two banners with the same position the software delivers both banners, by rotating them on that position: one time it will show Banner 1, next time Banner 2, then again Banner 1, then Banner 2, then Banner 1… and so on.
To deliver banners on a site you will place a javascript script on your site where you want the banner to appear. Lets see again the example with 2 banners in a position.
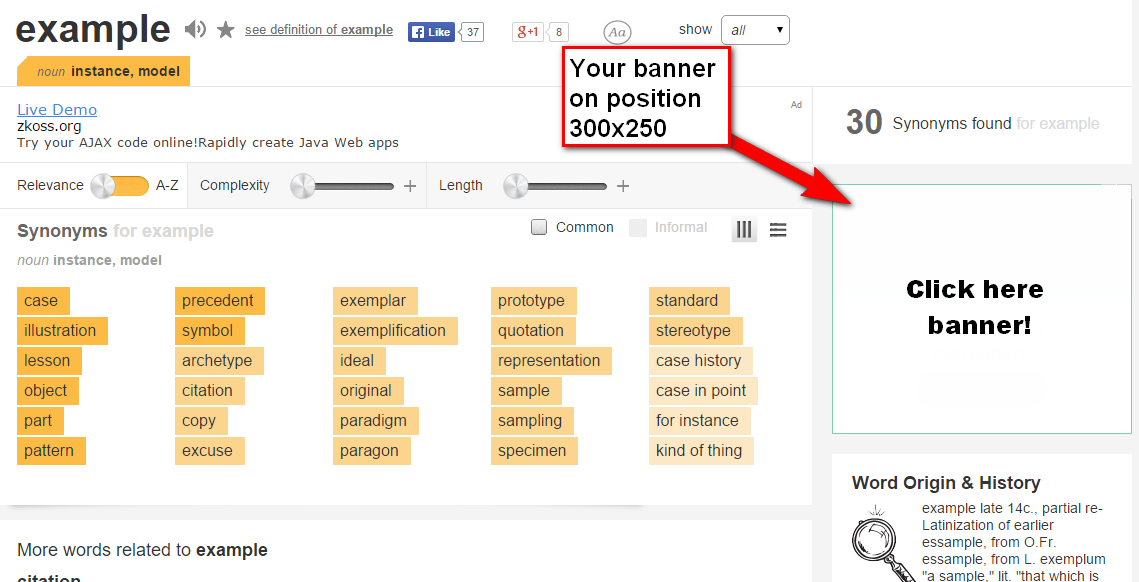
Suppose that the position is “300x250” placed on the top right your pages:
This means that in that site in the right sidebar there is this code:
<div id="AADIV9"></div><script>/* 300x250 */ for(var k=decodeURIComponent(document.cookie),z=k.split(";"),psc="",i=0;i<z.length;i++){for(var c=z[i];" "==c.charAt(0);)c=c.substring(1);0==c.indexOf("adcapban")&&(psc+=(""==psc?"":",")+c.replace("adcapban","").replace("=",","))}; var s = document.createElement("script");s.src = "https://www.barattalo.it/amb/ser.php?t=AADIV9&f=9&psc=" + psc;document.head.appendChild(s);</script>
This code calls the AdAdmin server software (ser.php) which searches for the specific banner position (f=9) that is a 300x250 position and prints out the first banner (which shows only a “click here” stupid jpg). The code also collects data from cookies to count visualizations in case of a “frequency cap” setting.
If you create two banners within a 300x250 position they will be rotated on that position. Each time the page is loaded a rotation is made. To see the two banners you have to refresh the page.
Banners are delivered until the ending date is reached or the maximum number of impressions are delivered.
This is the core of the software.
Lets see more details in the next chapters.
The menu changes based on the user profile:
Administrator Webmaster Advertiser
You can decide to use the software in different ways:
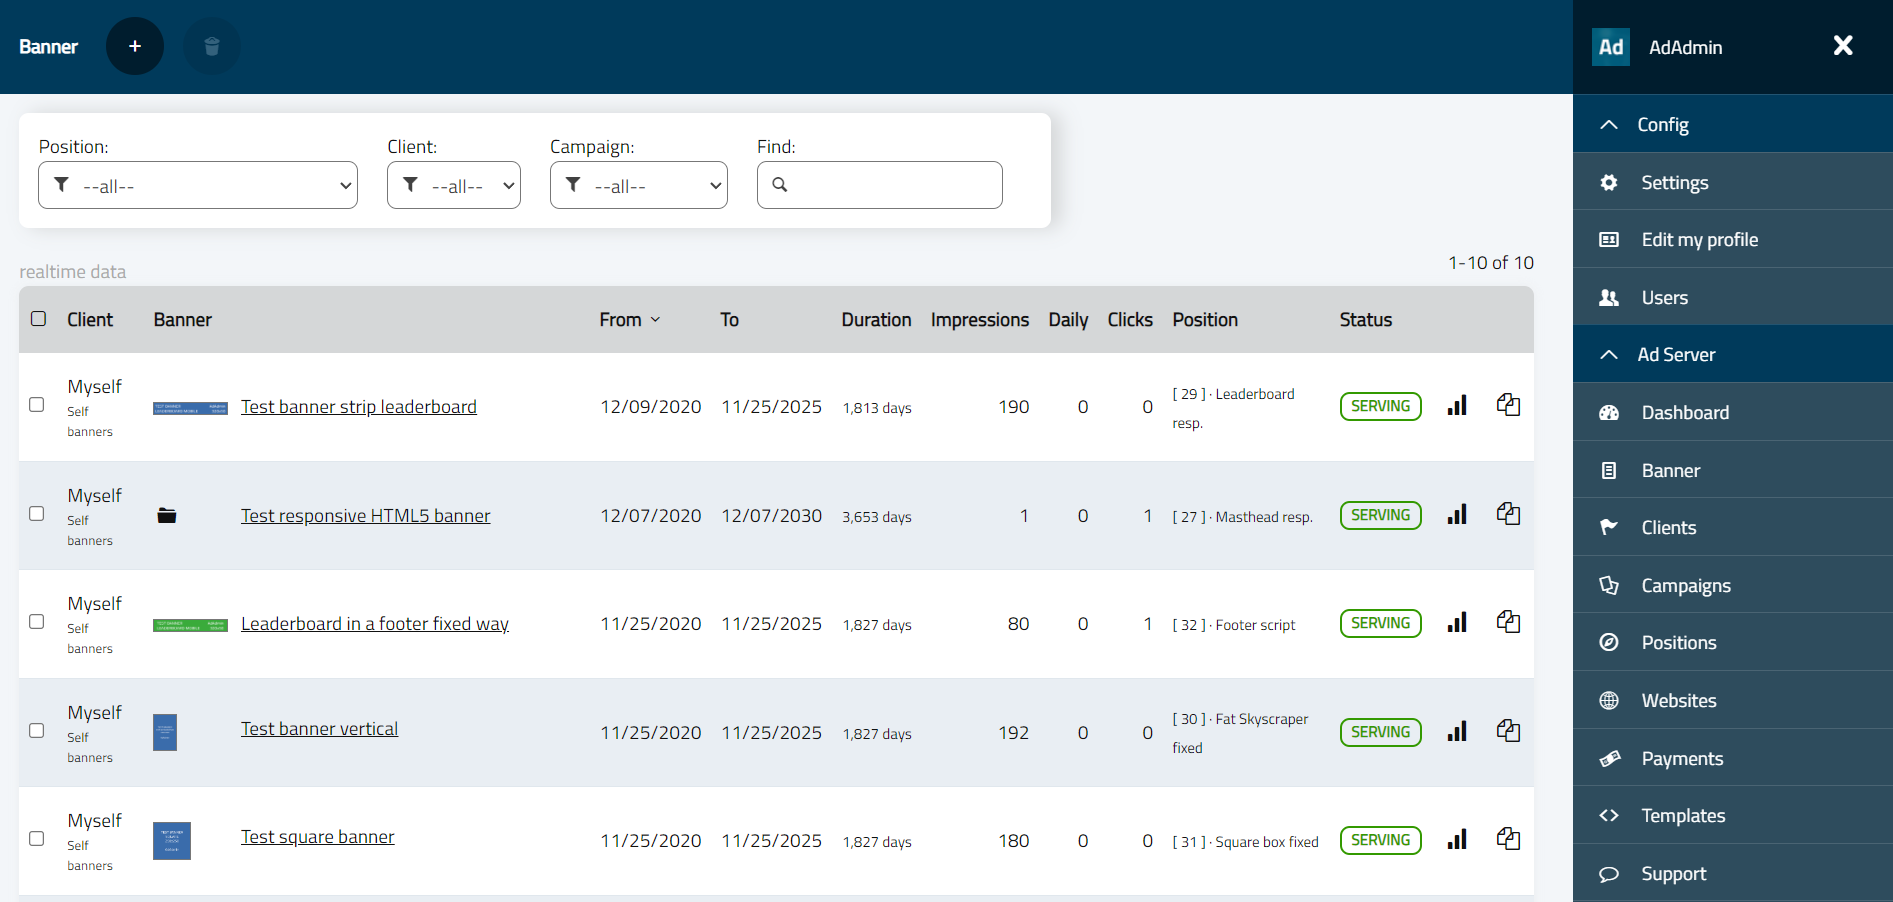
When you log in in the AdAdmin software you will see the list of your banners (when you have just installed the software this list contains some test banners):
For each banner are shown Banner’s title and belonging Campaign, From - To dates, the total number of days between the 2 dates, the daily average impressions delivered for the banner. The “Position” of the banner and its selling mode (CPM/CPD/CPC) and the Status which can be Serving or Ended or Paused or Scheduled (if you’re selling banenrs there will also be Not Paid and Pending). There is also a small preview of the banner, if -instead of the preview- there is an icon the meaning is:
html 5 banner uploaded with a zip file.
script banner with inline html/js
To edit a banner click on the banner title.
The icon commands on the right are Campaign Chart and Duplicate record.
The top control panel has some simple commands to filter the banner list based on status, position, client, campaign.
You can search banners using the “Find” field in the top control panel.
You can add a new banner and delete a group of banners using the checkbox on the left in the list and the Delete selected command.
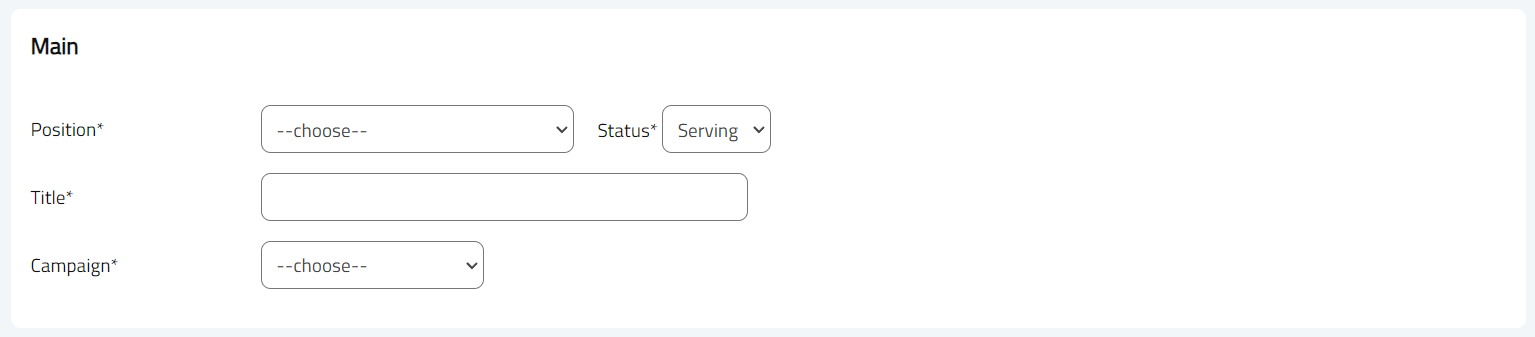
This page is divided in a few parts:
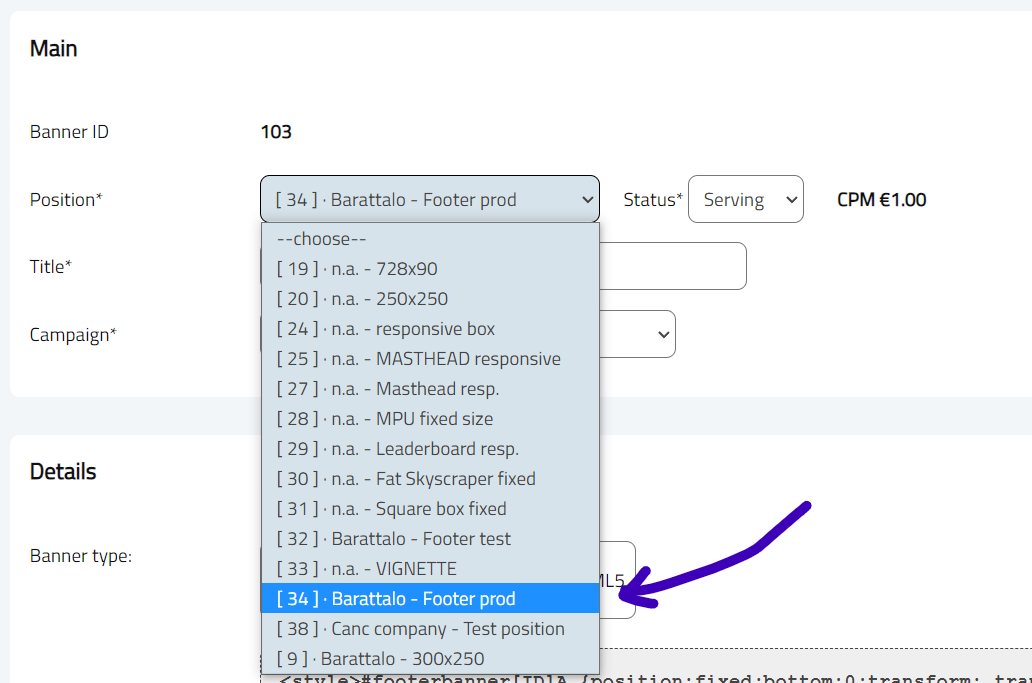
When you edit a banner you will see the ID of the banner. You can specify the “Position” of the banner.
You can decide to turn it on or off with the Status selection (Serving or Ended).
There is also a Paused status which can be used to temporarily block a banner from being viewed.
You can choose a Title for that banner and a Campaign. Banners are ideally grouped in advertising campaigns bought by a client.
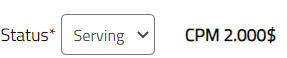
When you sell banner near the status you will also see indication about the price model used for selling this ad position:
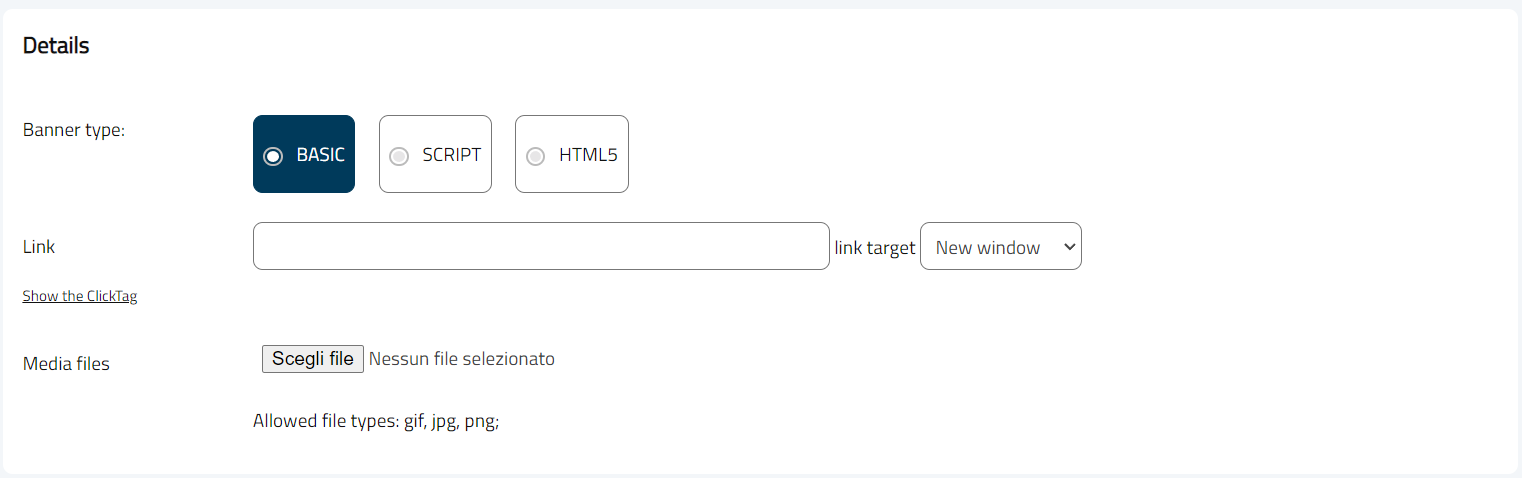
You can create banners in three ways.
Basic banners: banners made with an image (GIF, JPG or PNG files allowed) and a link. Upload the proper image file (match your banner image size) and fill in the destination link.
The toggle “Show the clickTag” allows you to see the link that will be used when AdAdmin shows the banner. The clickTag is necessary to insert the link in HTML5 banners to complete the tracking process (see the HTML5 paragraph below), but can be used to track text links in articles outside normal banner behaviour. More information about this feature in this article: Tracking clicks on links in text.
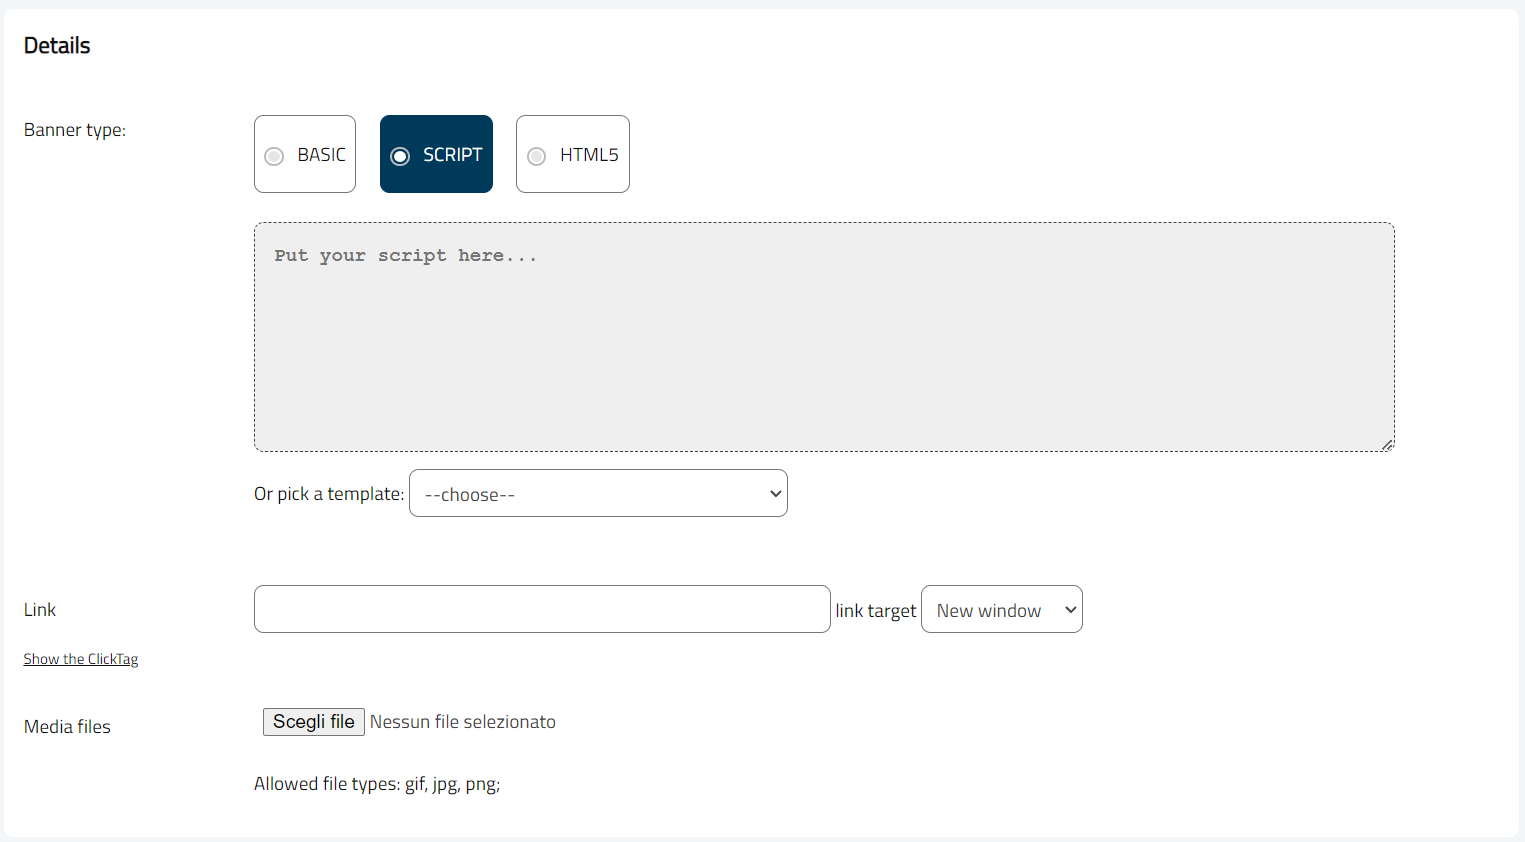
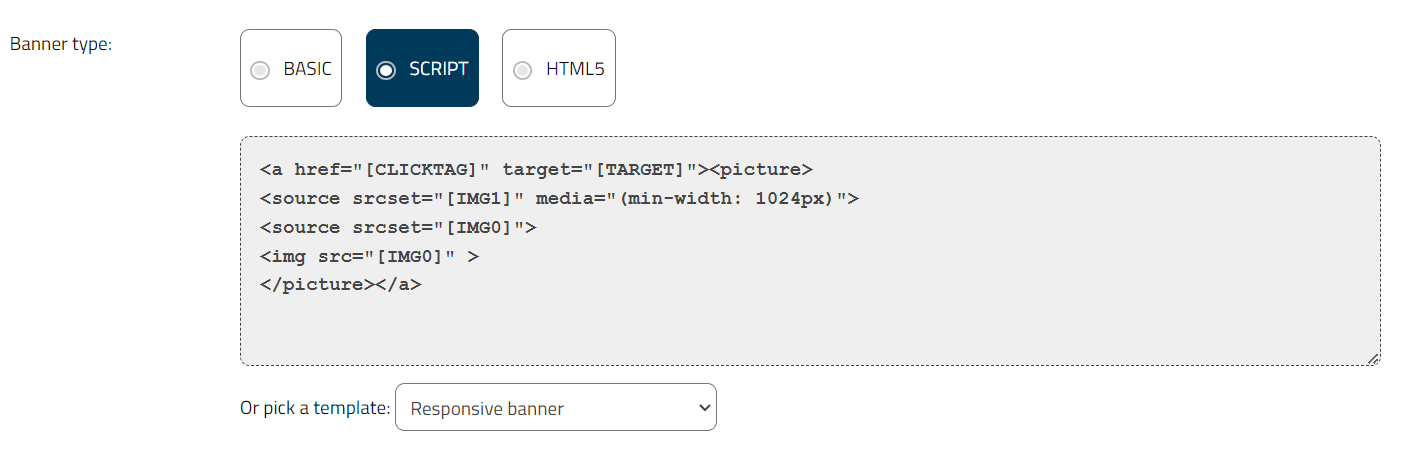
Script: Instead of a simple banner, you can create a block of HTML code to show a banner, here you can also place an external service code, such as the Google Adsense script. We’ve also implemented “templates” to easily add a scripted banner to handle, for example, responsive banners, overlays, etc..
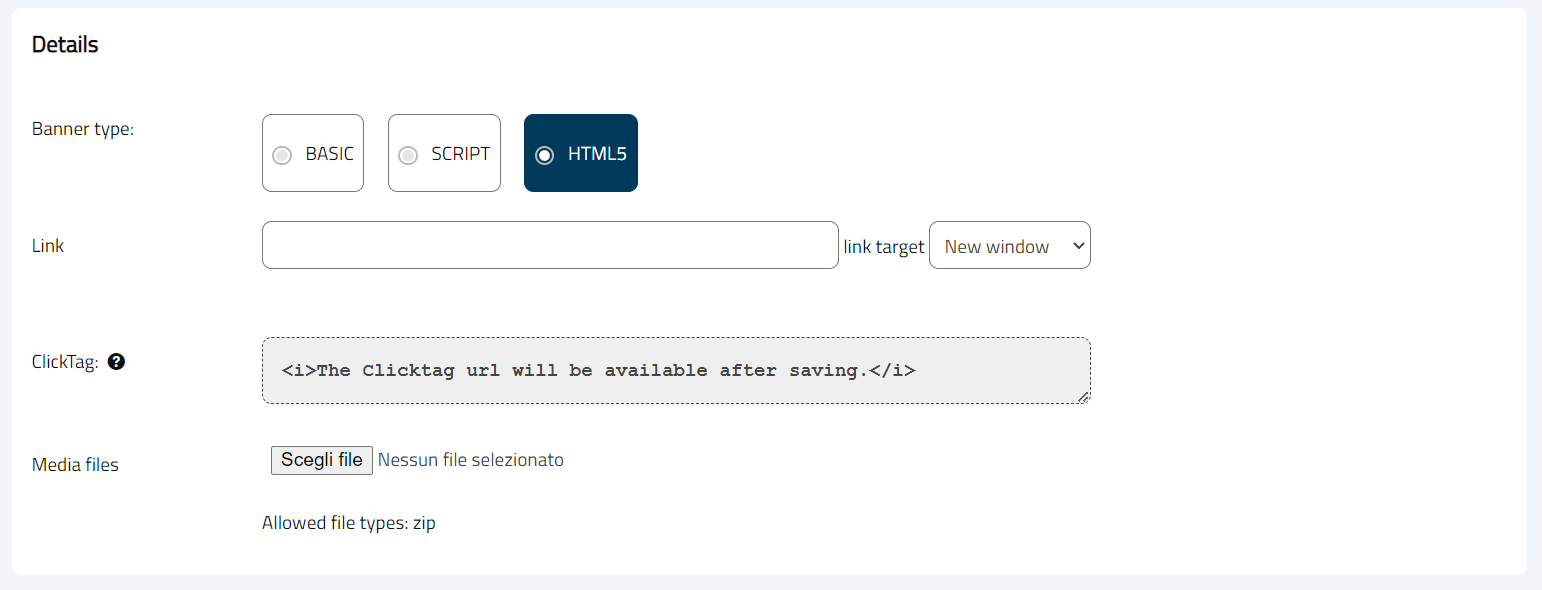
HTML5 banners: banners made with HTML code, you can use images and javascripts. The creativity can be uploaded with a ZIP file. Read the further subchapters for each case details. The clickTag is the link you have to put in your HTML code to track the click.
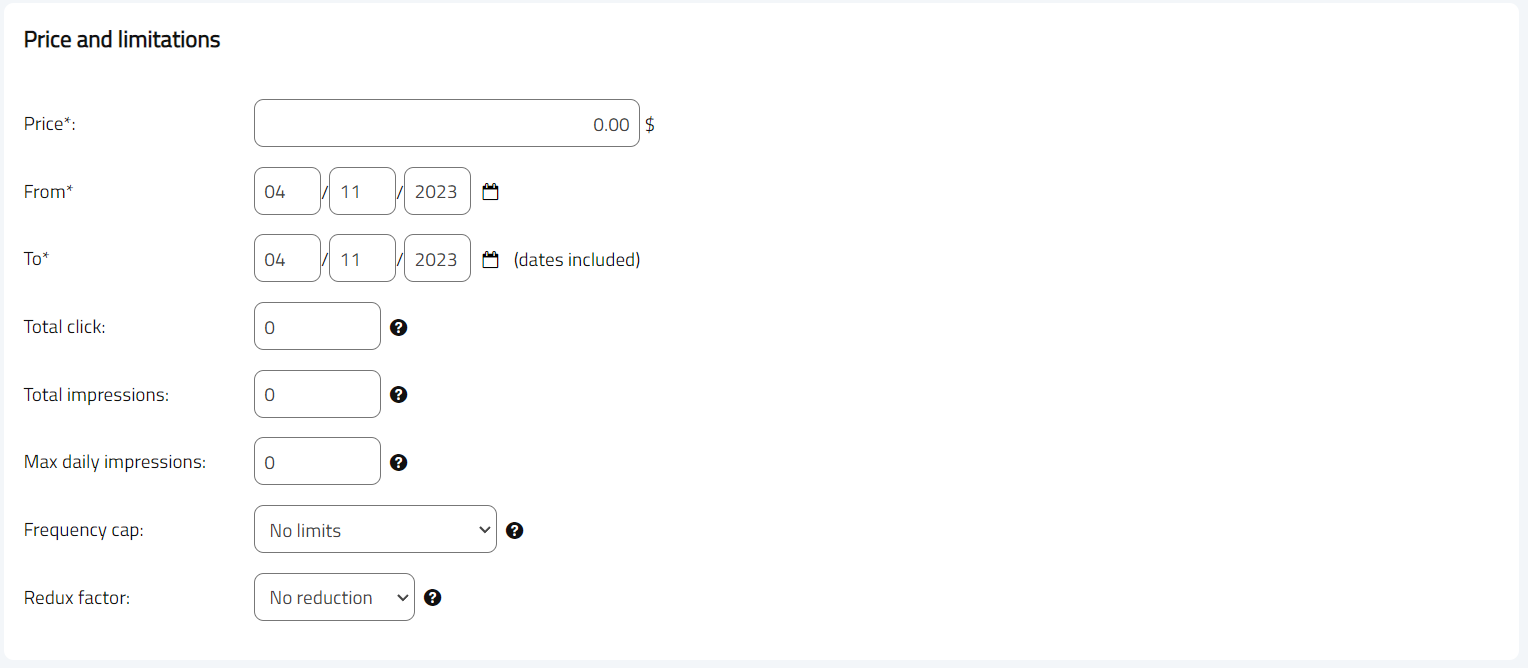
In this panel you can specify how long this banner will be shown, you can decide the starting (From) and the ending (To) date (the dates are included).
You can also decide to put a Total impressions limit for a banner (suppose you want to limit to 100.000 the total impressions for a banner, you can specify it here).
When the banner reaches the limit (the total limit or the ending date) it will automatically change its status to “Ended”.
You can also specify a Daily limit, that is to say that you can limit the number of impressions of a banner in a day. When the banner reaches this daily limit the banner is no longer served for today but it will remain in the status of “Serving” and will be delivered again tomorrow.
For example you can put 100.000 impressions as total limit and 10.000 as daily limit. So, if you have a lot of traffic you can prevent the banner from consuming all the impressions in a small period.
You can also limit the total number of clicks on that banner, so you can sell banners linked to their performance (the number of clicks received). If you put 100 clicks as a limit, for example, the banner will stop when it receives 100 clicks.
The limits work together, so you can place a banner which has a period limit, a daily limit, a total impressions limit and a number of clicks limitation.
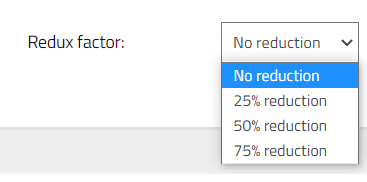
In limits there is also a “Redux factor” that can be used to fine tuning banner views by:
Suppose you have two banners in the same position. If one banner is more important you can reduce the number of views of the less important one so that the more important is more visibile. If the banners have the same value you can leave “No reduction” as the selected redux factor.
Frequency cap allows you to show a banner a defined number of times per user per day. Normally there aren’t limits. This can be useful if you use for example overlay banners that cover your content, since they can be annoying.
In this panel if you’ve activated the geolocation with ip address feature you can specify a geographical target for your banner.
When you choose this targeting method, every time a banner with geolocation value setted should be displayed the software checks if the ip of the current user is in that location. If it is, it shows the banner. If it isn’t the banner is skipped, the view isn’t counted and another banner is displayed.
See Config GeoIP for more information on Geolocalization.
There are also limits to show banners only on mobile devices or desktop browsers, normally banners are shown to both desktops and mobiles, and you can also target specific operating systems by checking the OS names.
Simple banner is created by AdAdmin software using one image file and a target link.
This is the simplest banner type you can create: select an image from your computer and upload it. Be sure to match the dimensions for the Position you have selected. That is to say: pay attention to upload a 300x250 banner in a position created for a 300x250 banner. If the banner is a 728x90 pixels banner don’t upload it in a 300x250 because this could cause problems to your site (break the template or appear stretched).
To deliver this banner the AdAdmin server will output an HTML code which shows the image with a particular link that tracks the click of the user.
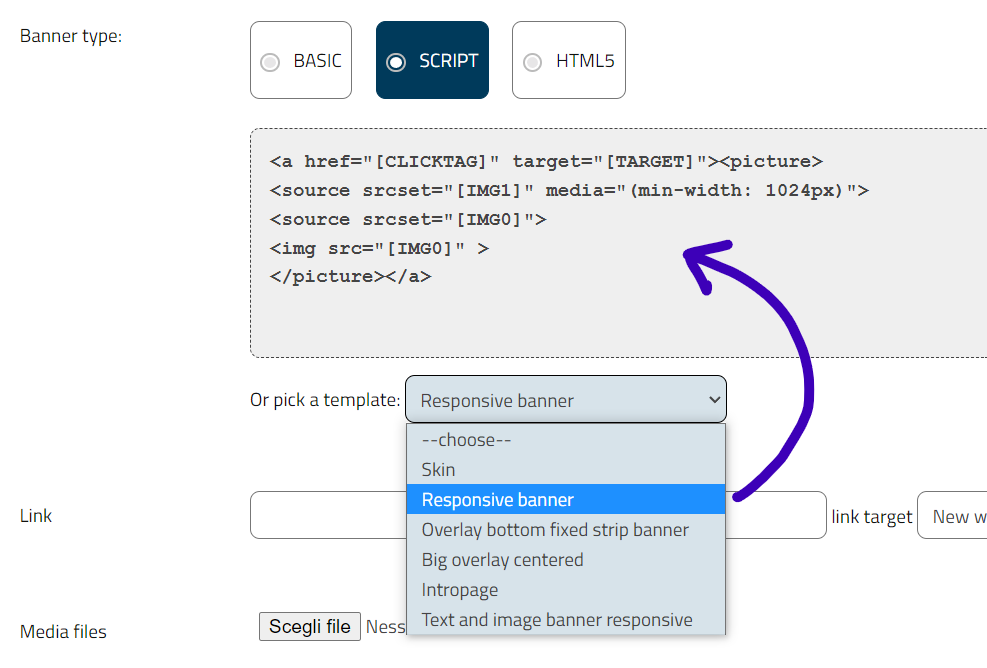
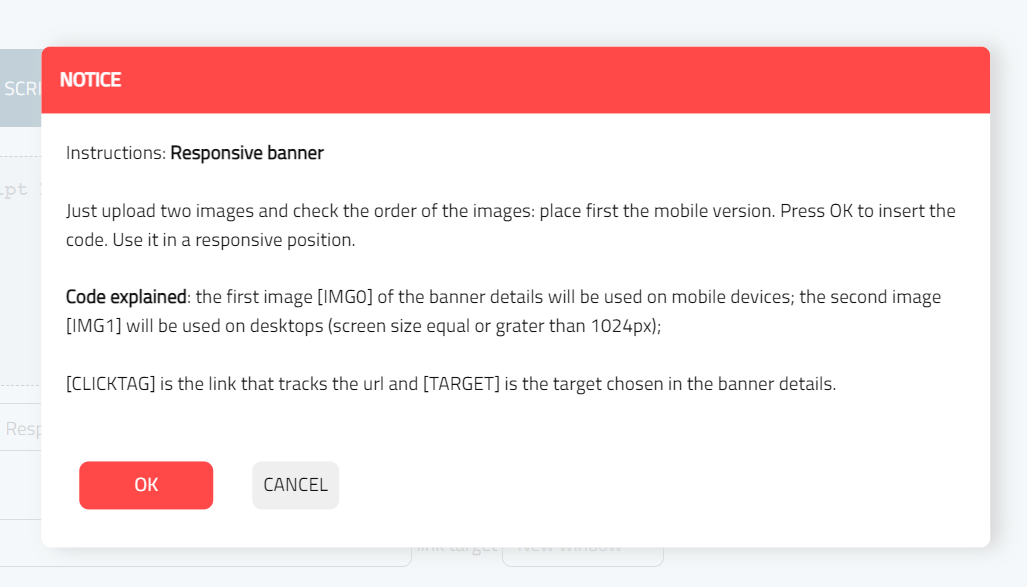
You can create a responsive banner with 2 images, for example one for small screens and one for desktops. This is, for example, a MASTHEAD banner, with resolution 970x250 on desktop and 320x100 on mobile. To make this job you have to use the Script text area and input here the correct HTML code to display the image.
To simplify this process we’ve created “Templates”, a tool that helps you create scripted banners using a library of templates.
Choose a template from the select list under the script text area, a pop up with information about the template chosen is shown and after clicking OK the proper code will appear in the script text area.
The templating tool uses shortcodes between square brackets to insert values in the banner during the delivery process.
Here is the complete lists of the codes supported:
Can help. This code is sobstituted with the ID number of the banner.
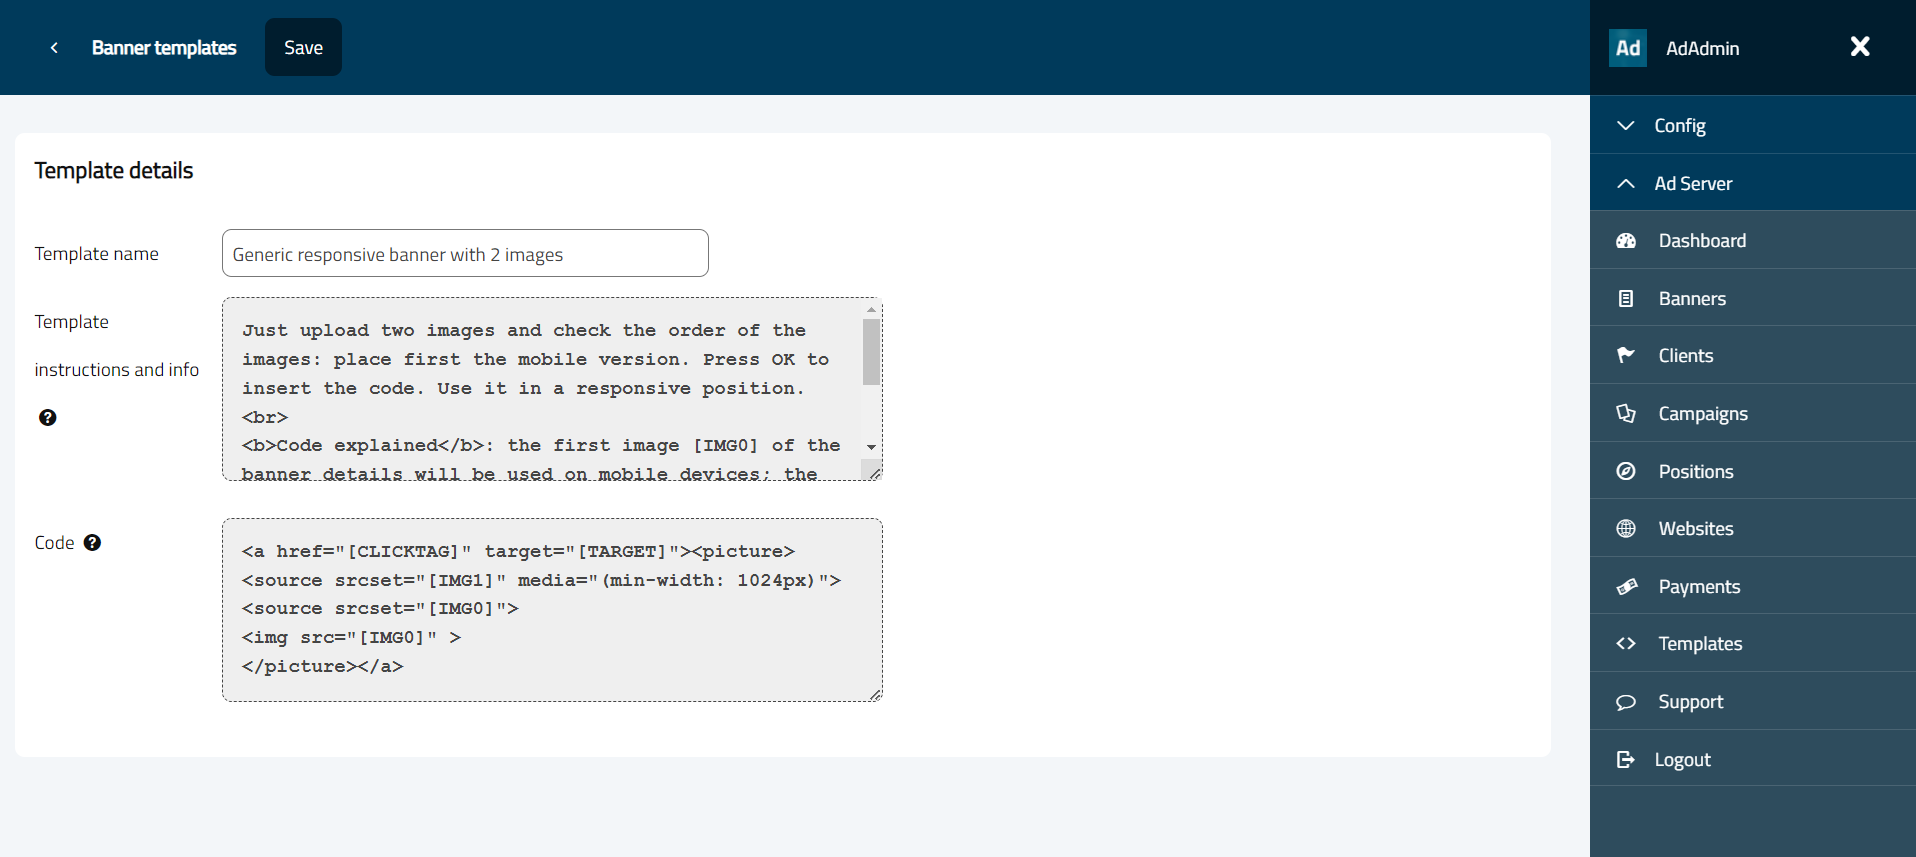
The “Responsive banner with 2 images” template is a responsive bannner that can be used to deliver Mastheads, Leaderboards and other classical formats that have a size for desktop and a size for mobile.
Take a look at the “Templates tool” section for more information.
AdAdmin supports HTML5 banners.
These banners are more complex and can be used to make banners that contain videos or animations. You must code the banner by yourself (note: for a simpler responsive banner, you can use the Alternative Script text area and the Template select, see “Creating a responsive banner with 2 images and Templates”).
The HTML5 banner must be uploaded inside a ZIP archive.
The ZIP file must include an index.html (the filename is important) file which composes the creativity, it could use images files (jpg, svg, png, gif) and could use additional css file and javascript file. If you prefer you can also include JS and CSS code inside the index.html file (it will be faster for delivery!).
HTML5 banners are delivered with an iframe html tag that points to the index.html file, this iframe tag will have fixed dimensions or a liquid (100% width) dimension based on the settings of the position. The liquid dimension is needed for responsive HTML5 banners.
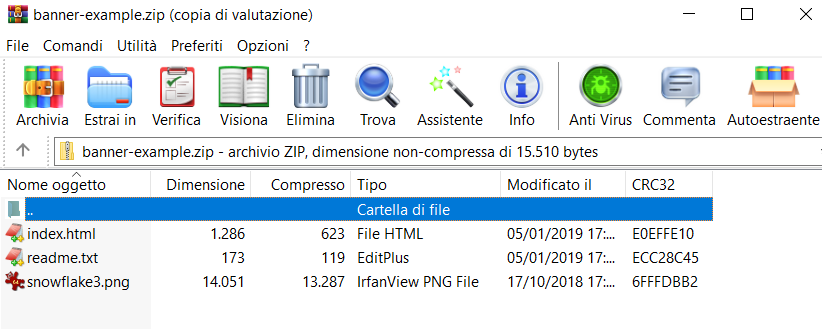
All files in the ZIP archive must be at the same level and the archive must not contain any folder. Seen with WinRar here it is an example of the content of the ZIP file:
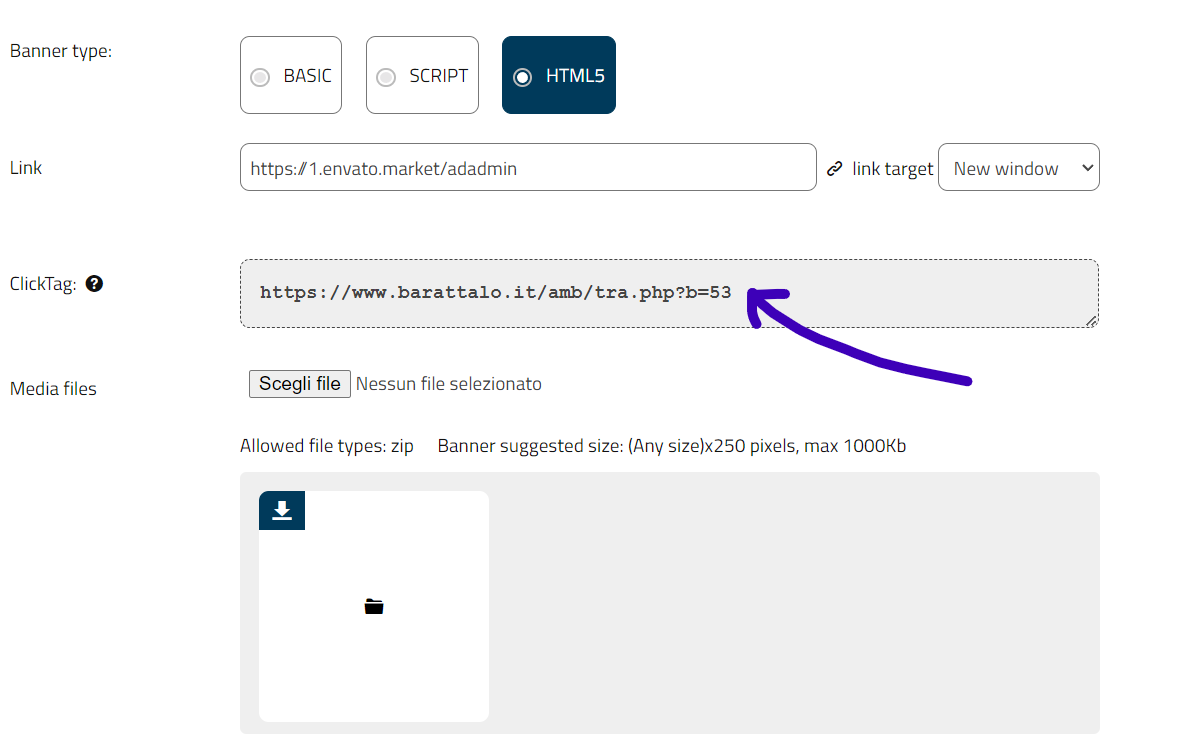
Inside your code remember to use the ClickTag provided in the Main Data of the banner detail page.
Instead of the link (anchor tag) of your final client inside your html code put the ClickTag url.
In this way the AdAdmin software will be able to track the clicks made on the HTML5 banner. If you don’t use this trick your banner will still work but AdAdmin will not track clicks.
To get the ClickTag for your HTML5 banner, you have first to create the banner (save it without the ZIP file), so you can determine the correct link to use in your html code. You need the ID to get the link, and the ID is available after creation in the banner details:
Now you have an ID and a “ClickTag”.
Get the ClickTag and put it in your HTML5 banner, in the index.html file and create the ZIP archive.
When you have your ZIP file with the correct ClickTag you can proceed and upload it in AdAdmin.
Extra info for responsive banners
If you want to create a responsive banner with HTML5 and ZIP files, you must create the appropriate rules in your css. You have to use the design media queries inside your CSS rules to enable responsive behaviour.
The AdAdmin software allows you to make responsive HTML5 banners and you have to place them in a responsive banner position.
Responsive banner example
You can find an example of a responsive HTML5 banner in the banner-example.zip included in the package, or you can download it from this link https://www.barattalo.it/adadmin/example/banner-example.zip.
It’s a simple banner with index.html, an image and a readme.txt file. Inside the index.html page there is also CSS for responsive media query rules and a few lines of javascript to open the ClickTag in a new window.
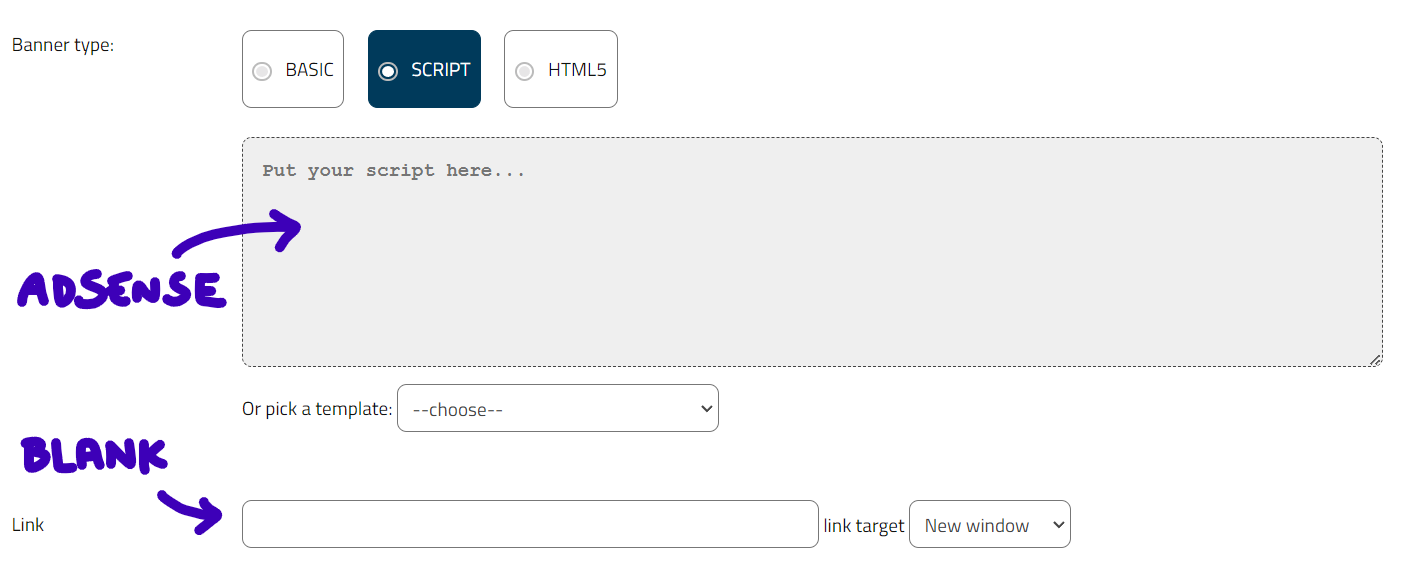
You can create a banner with an external script by simply inserting the script code in the Alternative script text area.
By doing this the ad server will output (in the specified position) this Alternative script instead of the normal output of the software. When you use the Alternative script you don’t need to insert any images or links, since the banner is the alternative script.
When you use an external script you can’t track clicks, but you can still track impressions.
Remember to put in the textbox only the script that shows the banner. Sometimes advertising agencies give you different scripts in a single text file, you have to place in the textbox only the javascript, normally a block of code between <script and </script> tags.
For example if you have Google Adsense place it here, and leave blank the Link:
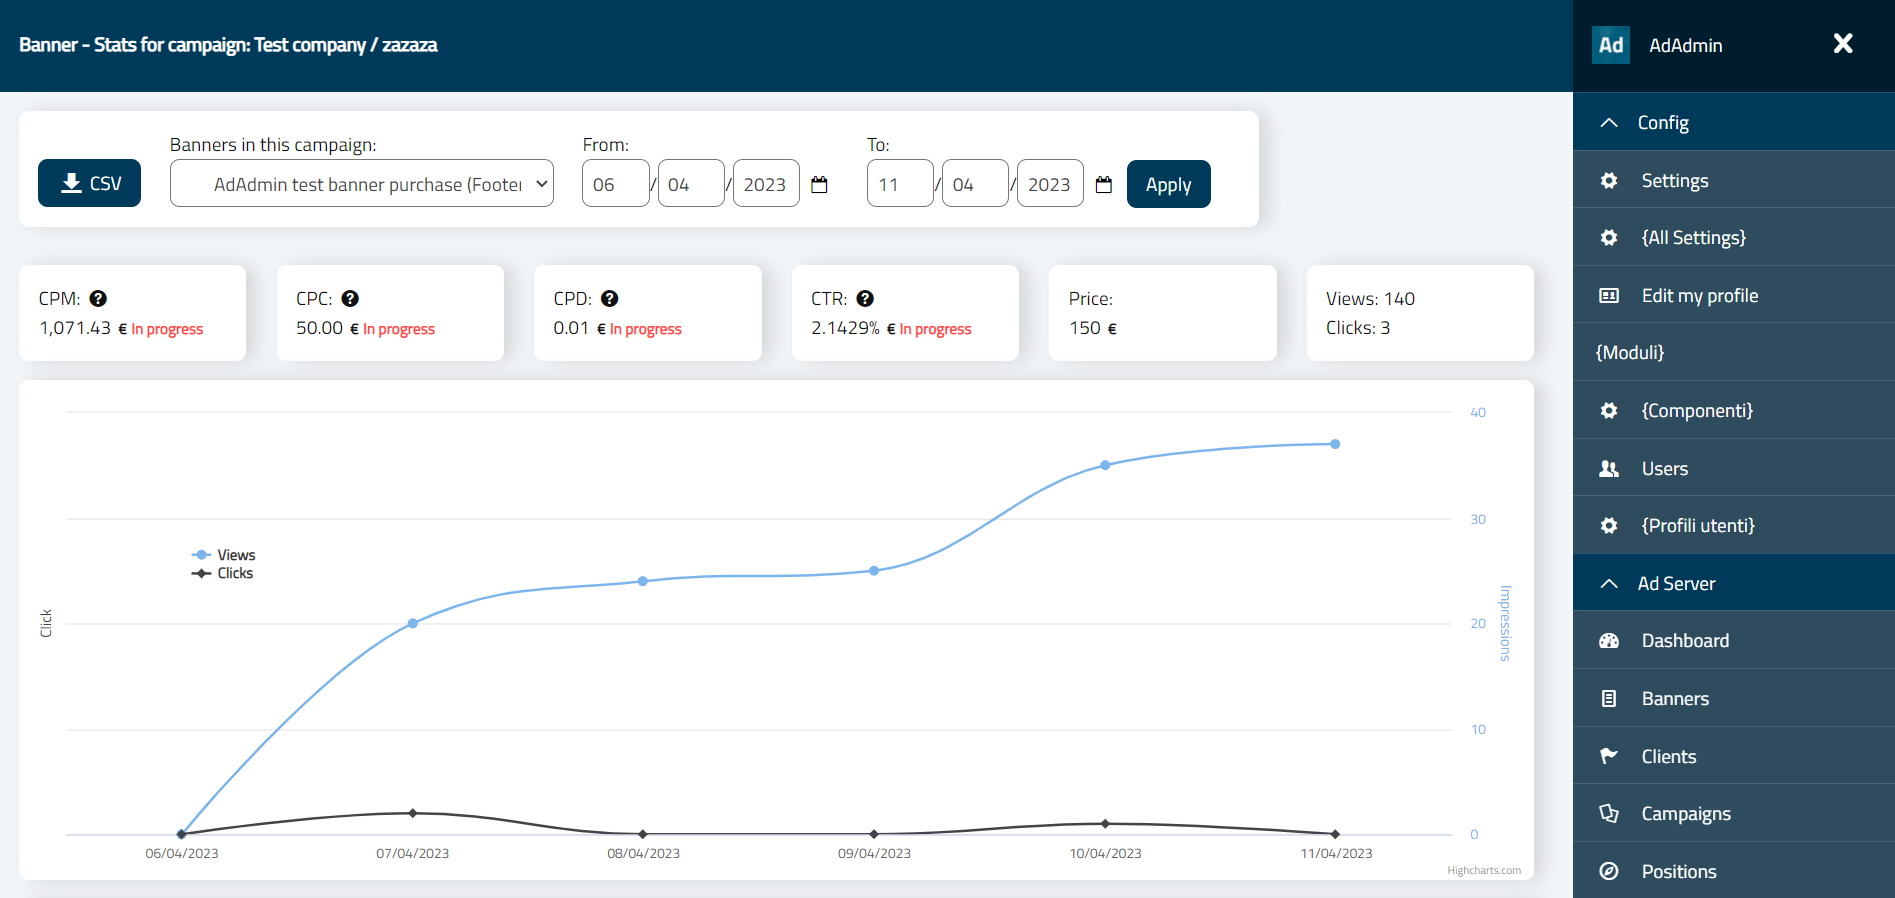
From the main page with the banner list you can click on the Chart link on the right to get a panel with a report of the last 30 days stats. This panel shows impressions and clicks.
The period can be changed with the controls at the top of the page, you can choose two dates to define the period.
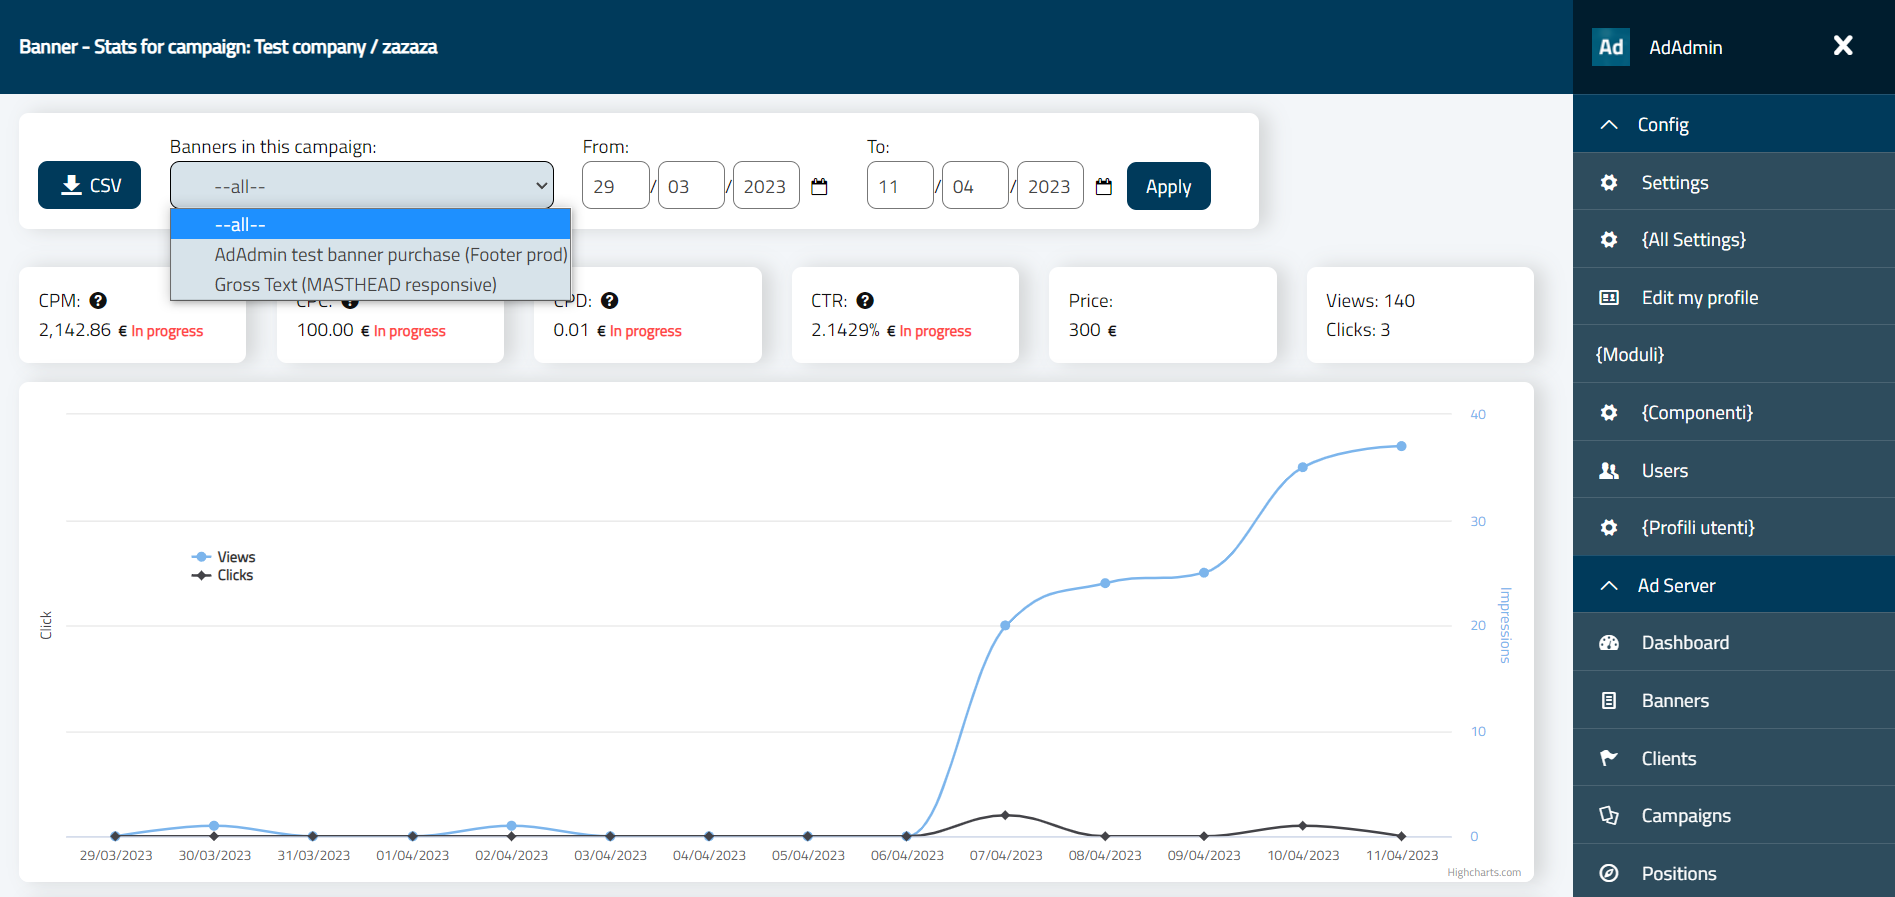
Data is also grouped, so you can see stats for a single Banner or for all the banners of a specific Campaign.
Click on “All” to see the grouped chart for the Campaign:
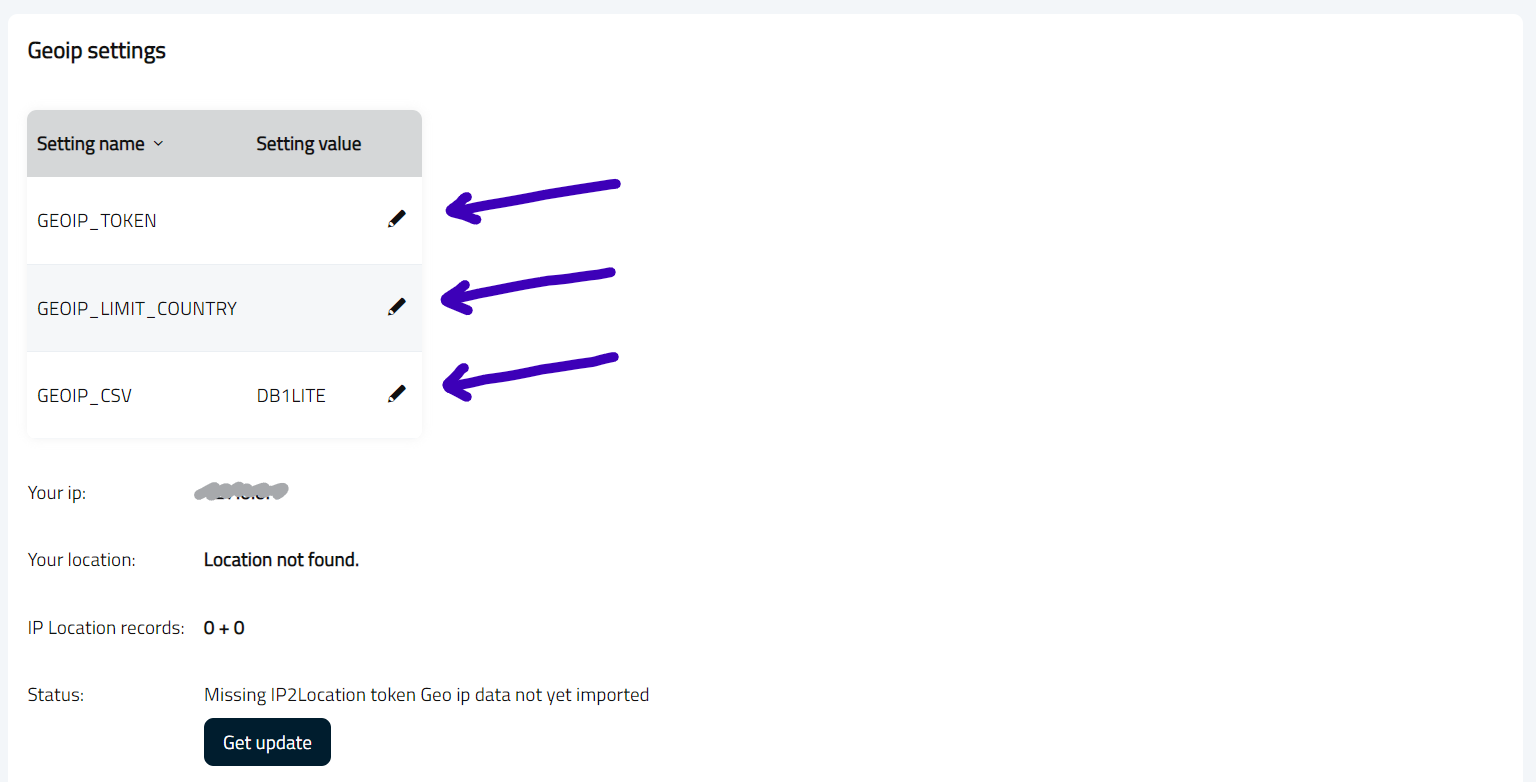
To use geo location to target banner views you have to download the IPs free database (or buy the more precise one) from this site https://lite.ip2location.com/ . The process is easy:
DB1LITE contains information for contries only. It’s small and it’s the best choose if you have to target traffic by country
DB3LITE contains information for countries, regions and cities. It’s quite big (uncompressed it’s 200MB) and containse 2.9M of rows.
If you choose DB3LITE with also data for regions/cities, you can limit the database to use only the data from a country (suppose you are in Italy and you want to show banners on different regions of italy). To limit the DB3LITE database to Italy, for example, put the code IT in the GEOIP_LIMIT_COUNTRY setting value.
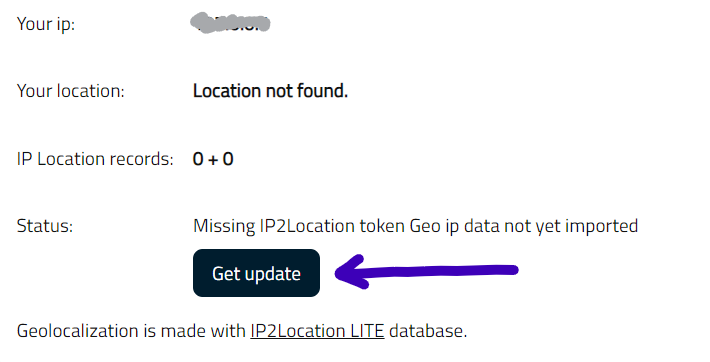
This will download the csv and import records. If you use DB3LITE db setting this action will take a while. Progress is shown and you have to wait.
The process could take 1 hour and you must not close the page. If you close it the process is stopped, but you should recover it by reopening the page and clicking the button again (in this case it will show a “Recover import” label instead of “Get update”).
IMPORTANT TIP: If you are interested in only 1 country region/city data, import everything and then manually delete the records not belonging to your country. This will speed up all the queries.
If you need help you can ask in the AdAdmin Codecanyon forum or write directy to me for support.
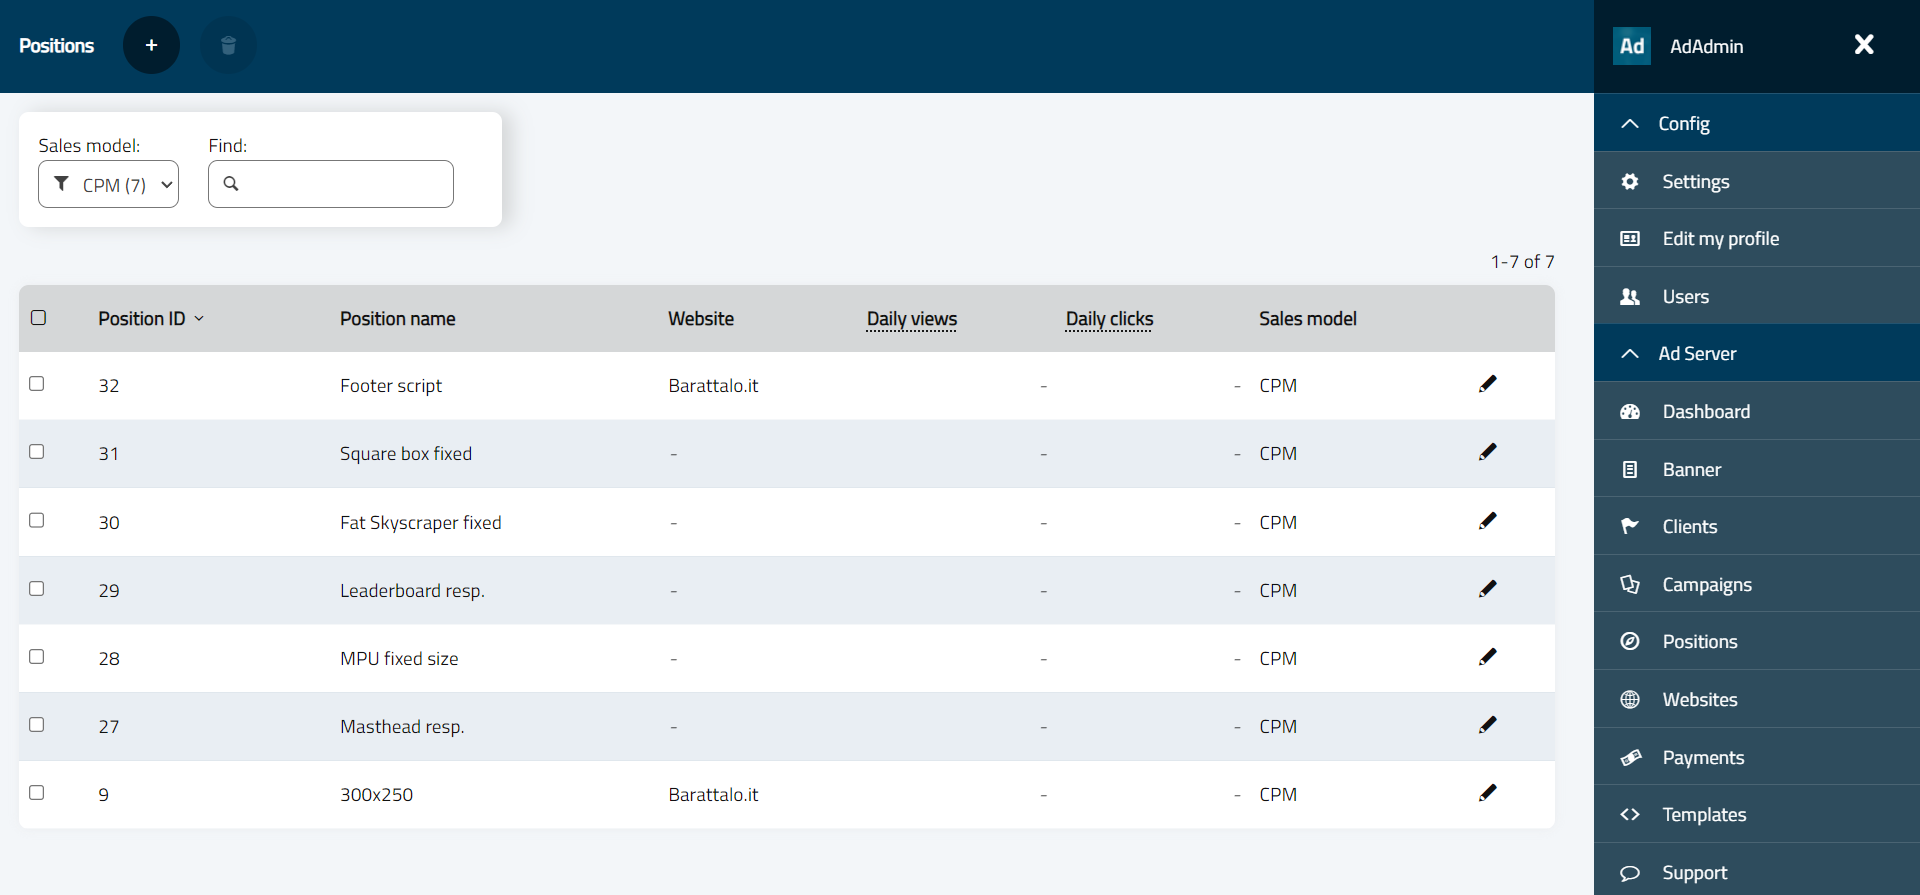
When you go to the main menu and click on the “Positions” menu item you will see the positions list. This is an example:
In this list you can see that there is a position named “300x250” (it’s the default created in the installation process). If you click on the pencil icon to see the details, you can also see the script code that you have to place in your HTML to show the banners.
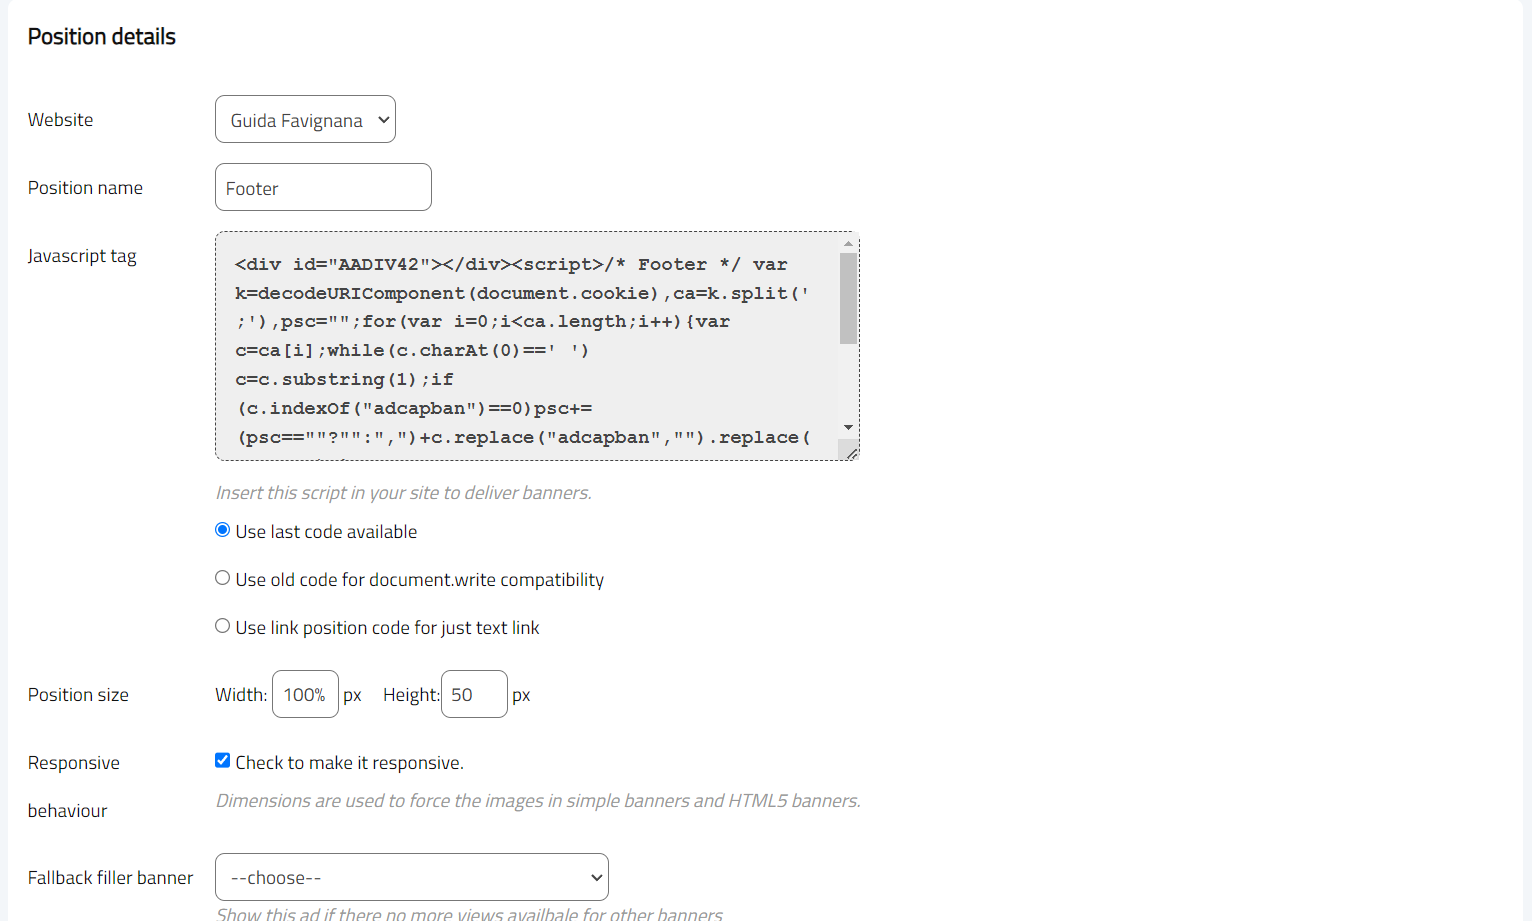
If you click “Add new” this is the blank form for creating a position:
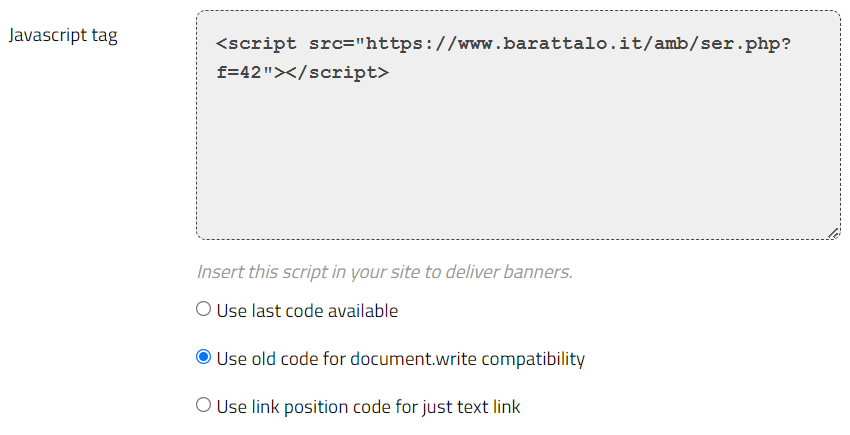
You have to copy the grey code from <div id=... to </script> and place it in the sites where you want to deliver banners. Just click on the code to copy it.
Under the textarea that contains the script tag there is radio button list:.
“Last code” lets you take the full functionality code for your position.
“Old code” changes the code and it allows you to use banners that use document.write javascript command, which is deprecated. Read more here.
“Use link position” lets you grab just a link that you can place in articles, blog posts, navigation. That link, when clicked, redirects the user to the banners links loaded in that position.
The check flag for “responsive” is normally flagged and it’s used to give a liquid width to simple banners and to HTML5 banners.
If checked:
1) the width of the simple banners will be 100% and height auto;
2) the width of the HTML5 banners will be 100% and height fixed to specified height.
This behaviour could affect the layout of your site (note that there is a difference between simple banners and HTML5 banners).
If you want to use HTML5 banners in a responsive position (for example to make a banner that transforms from a 320x100 to a 900x250) check this flag and then use HTML5 code to handle different window sizes inside your banner, through css media queries. The iframe containing the banner will be resized to match the height defined inside of the banner.
When you flag the responsive checkbox the width will be forced to “100%” and you can’t edit it. It will be controlled by the HTML5 code or by the layout of the site.
Each position that you create will be available in the position selector when you create/edit a banner:
The fallback filler is a banner already present in the Banners that is used to fill the position when there are no more ads to show. The banner choosed is shown also if it is “Ended” and views and clicks are normally counted.
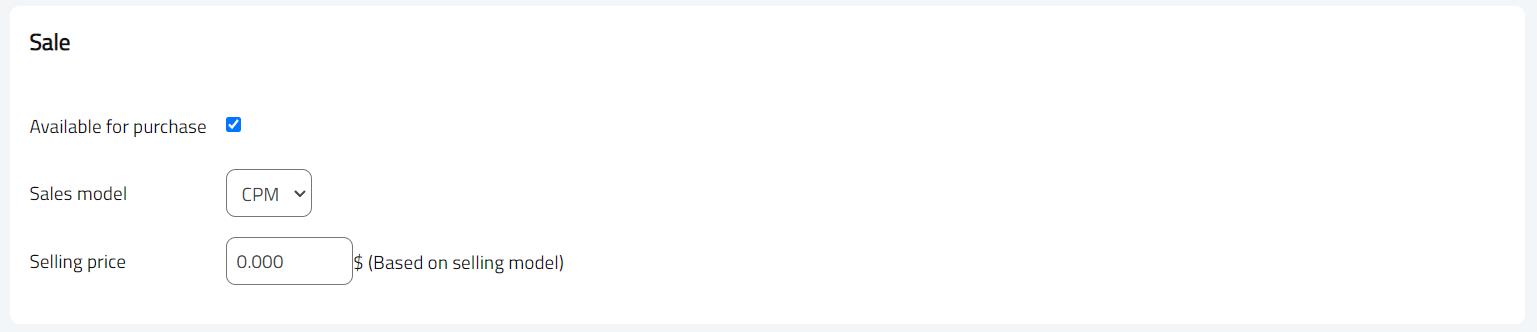
The flag Available for purchase lets you sell the ads in this position, and make this position available to advertisers. When you sell banners you have to specify the price.
There are three price models available:
These data will be used to calculate the price during the sell process of the advertiser.
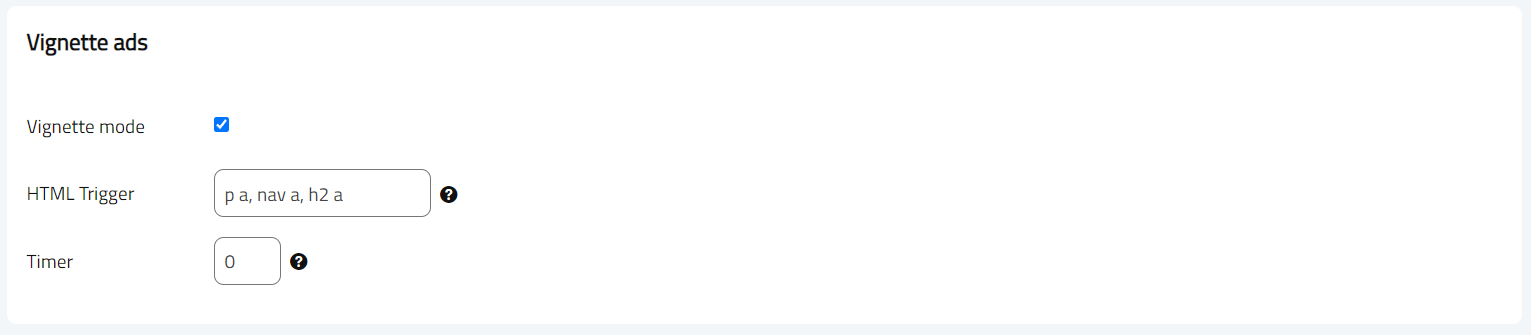
Vignette ads implementation in AdAdmin is similar to Google Adsense vignette ads. This position must be used just one time for a page and. When a user clicks on a link it will open a layer with a timer in the upper right corner. When the timer reaches zero value the timer becomes an “X” icon to close the ad and go to the clicked link.
When you config this kind of position you can specify the html trigger that opens the overlay and also the timer. The default trigger is “p a, nav a, h2 a” which means that the trigger is hooked at “a” tags under paragraphs (“p”), under navigation (“nav”) and under headings 2 (“h2”).
You can change this behaviour, it’s a selector used in a Javascript selector command.
AdAdmin comes with some ready to use banner templates. You can create and customize templates by clicking on the “Templates” link in the menu.
Using templates
Template banners are then used in the detail of a banner during the banner creation process.
These banners are scripted banners that can be replicated and modified to rapidly create banners with special behaviour. For example, the overlay banner is a scripted banner available in Templates that creates an overlay on the screen of the user with a X to close the banner.
When you create a banner and want to use a Template, simply choose Script/template and pick the template from the select list under the text script area. When you choose a template from this list a pop up appears with some information about the template chosen.
For example if you pick “Generic banner responsive with two images” you will see this text:
When you click OK the code of the banner is placed in the script text area.
As you can see the code contains some special codes between square brackets. These codes are called shortcodes and are changed by the AdAdmin software during the delivery process of the banner.
In the above code, for example, the CLICKTAG code is changed with the link that tracks the user click and redirects the user to the final target.
Here is the complete lists of the codes supported:
Can help. This code is sobstituted with the ID number of the banner.
Creating a template
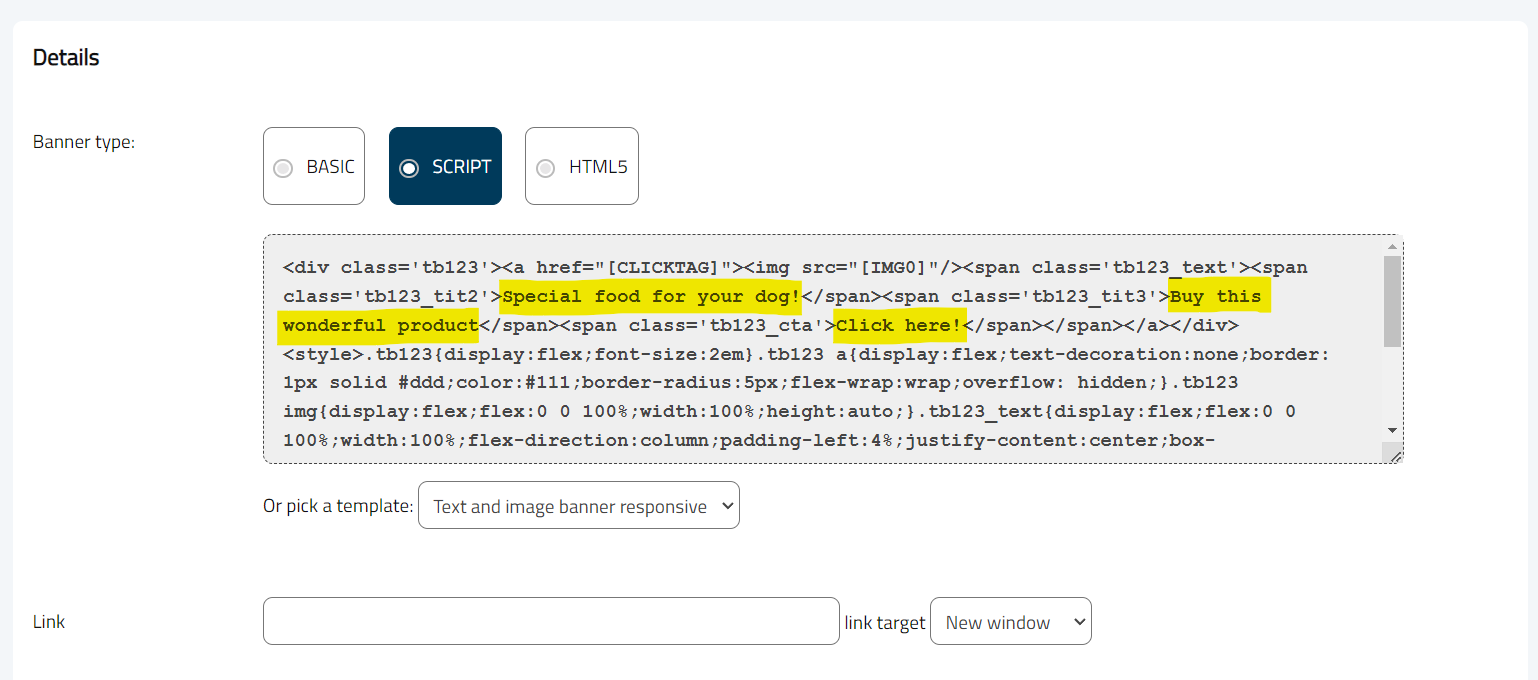
When you create a template you are required to add the name of the template, a text of instructions and the code.
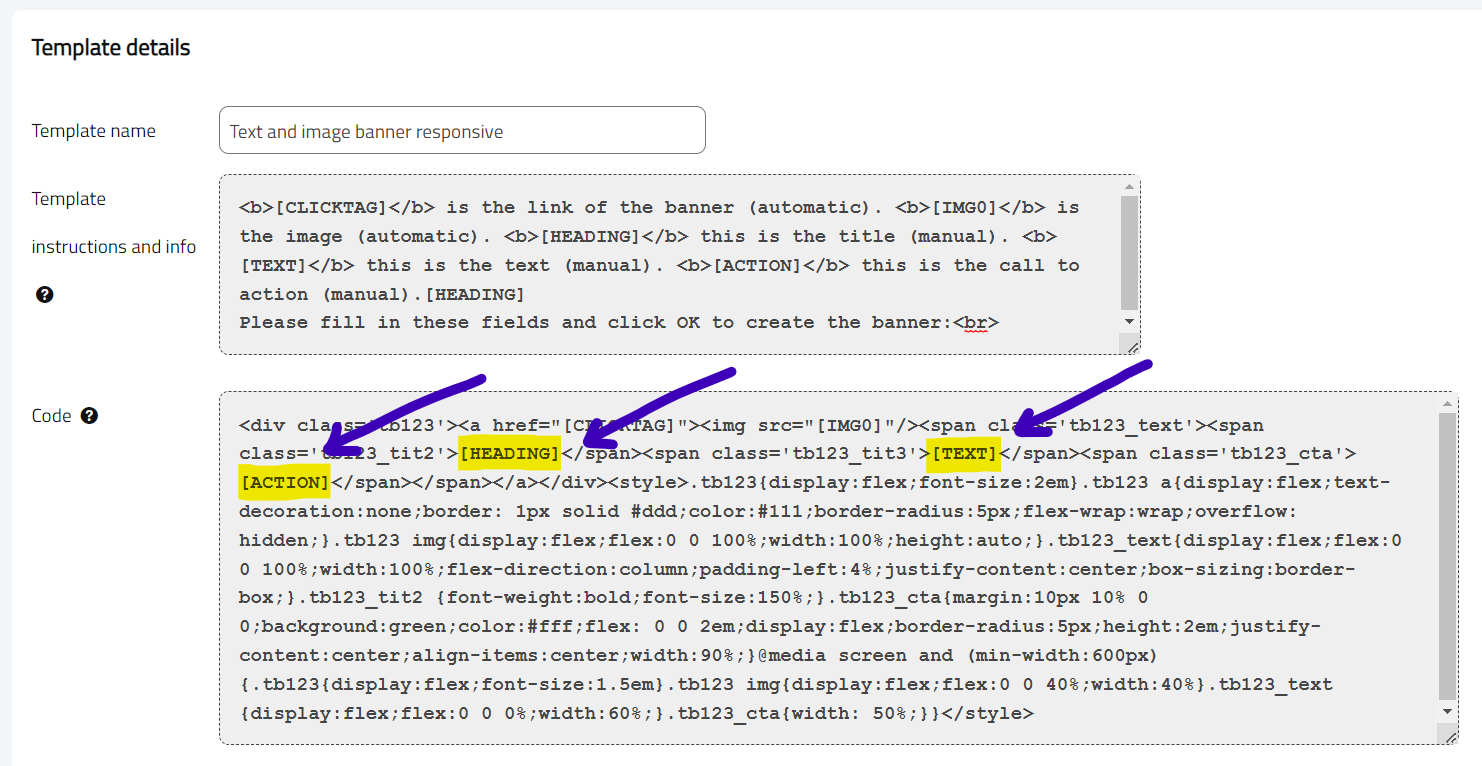
In the Code section you can also create custom shortcodes.
You can watch an example in the “Text and image banner responsive”:
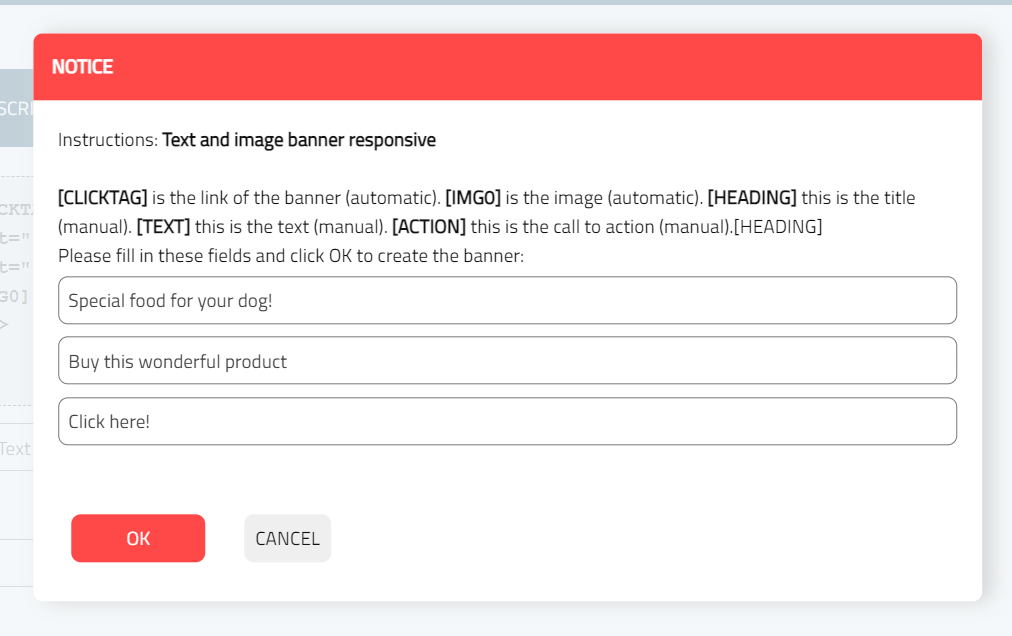
This code contains [HEADING], [TEXT], [ACTION] shortcodes which are not present in the allowed shortcodes listed before.
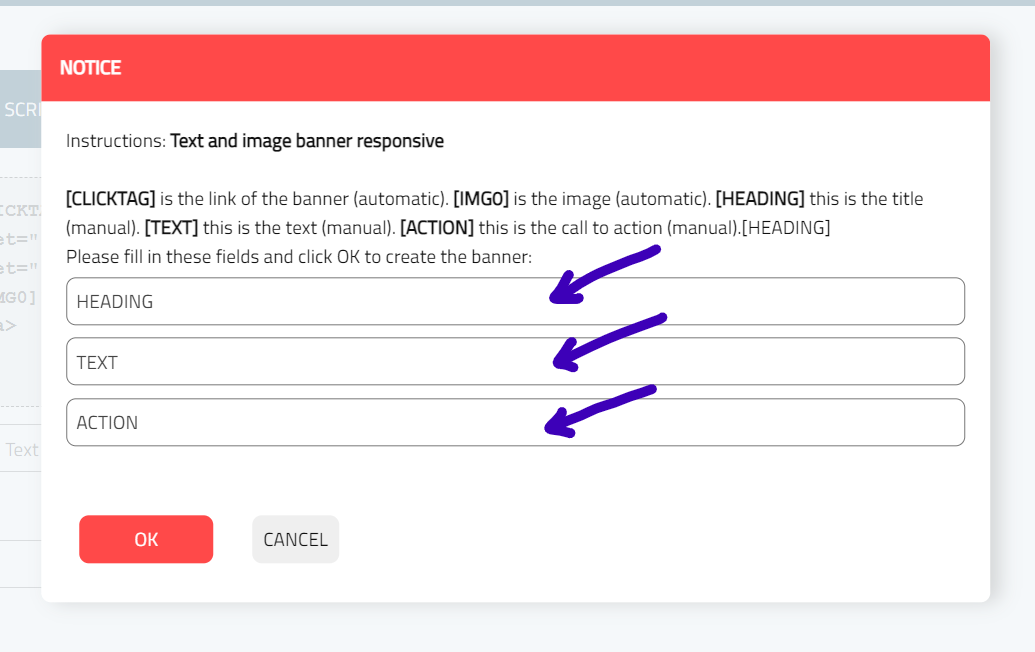
In this case, during the banner creation, when a user pick this template from the select list he is asked to fill in the new shortcodes:
This process will substitute the custom shortecodes in the template and simplify the process of creating the banner. You don’t have to manually edit the code script text area.
And after choosing the image, this is the final result, a text banner responsive with an image and text:
Banners are displayed in Positions. Banners belong to Campaigns. And a Campaign belongs to a Client. So, when you create a banner you have to specify a campaign and this will determine the client.
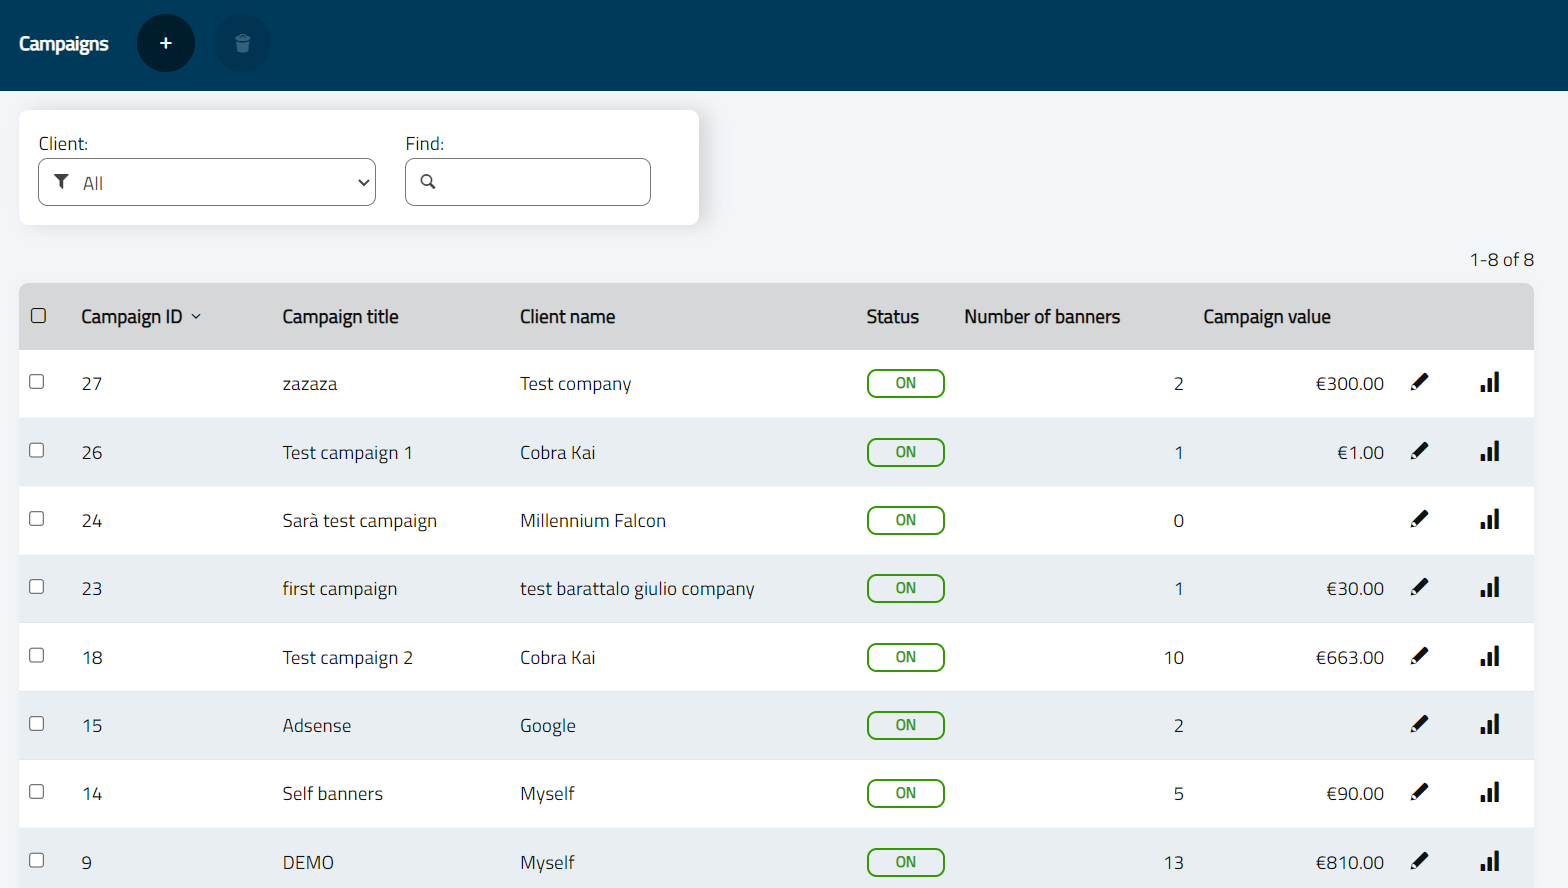
When you click on the “Campaigns” menu item, you will get the list of campaigns, like this:
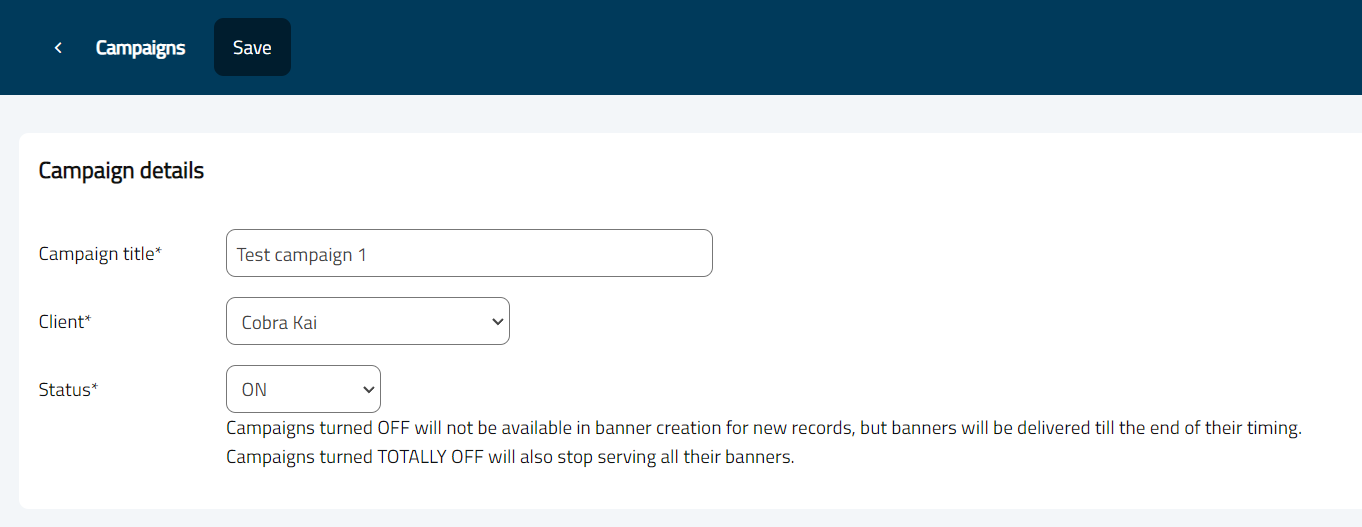
With the pencil icon you get the Campaign detail:
You can choose the Client who this Campaign belongs to and you can specify the Status of the campaign. Campaigns turned OFF still show banners! By turning OFF a campaign you will hide it from the banner detail so you can’t choose a turned OFF campaign in new banners.
TOTALLY OFF also stops serving ads.
From the campaign list you can click on the chart icon to see the graphic daily chart of banner views and clicks.
You can change the start and end date and filter for each single banner of the campaign. You can also export all the chart data to CSV format for your custom analysis.
When you click on the “Client” menu item you get the client list:
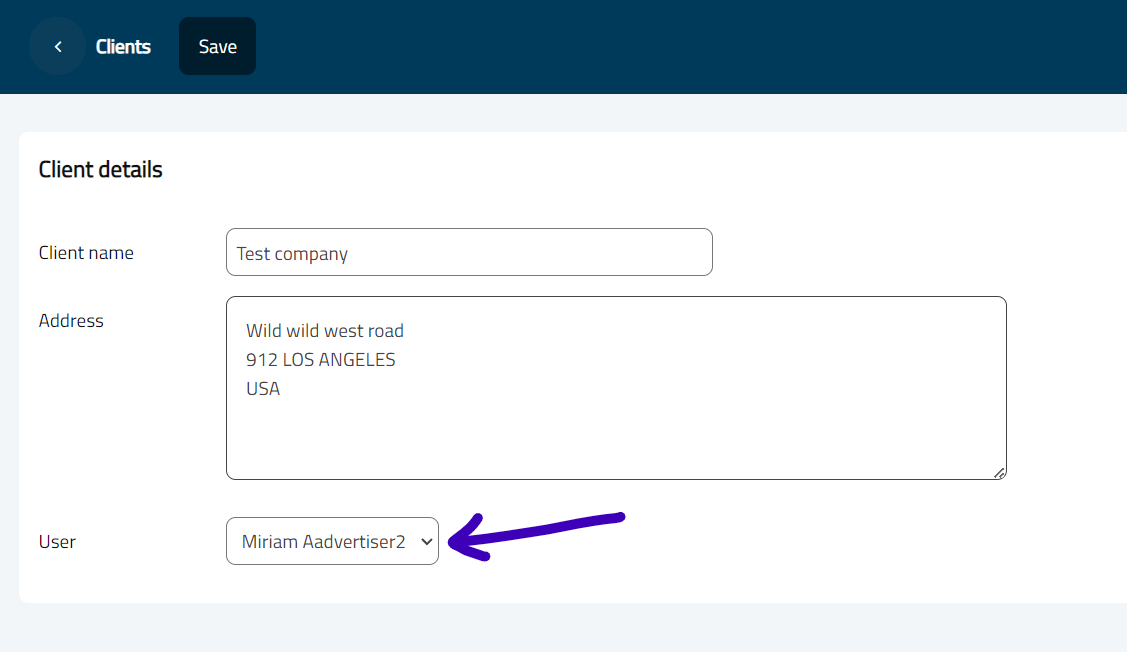
In the client detail view (you get it by clicking on the pencil icon) you can manage the name of the client and the users who can see the details of a banner as guest users.
In the Client detail view you can select an “advertiser” user to view the banner statistics for a banner or a campaign. This feature is useful if you want to let your client see by himself the performance of his banner.
He will be able to see how many impressions are delivered daily and how many clicks there are for each banner.
Choose the user from the select list of available users (each user can handle only one client):
If you activate the selling process with payments, users can register to AdAdmin and their client is automatically created.
When you install AdAdmin software the installation process will create three users with three different profiles, an admin user, a webmaster and an advertiser user. Admins can do everything: create, edit and delete banners, campaigns, positions, clients, websites and users.
Advertisers (if PAYMENTS setting is ON) can buy ads, create campaigns and see stats. They can also see the list of available websites.
If payments are OFF Advertiser users can only see their banners, campaigns stats and websites list.
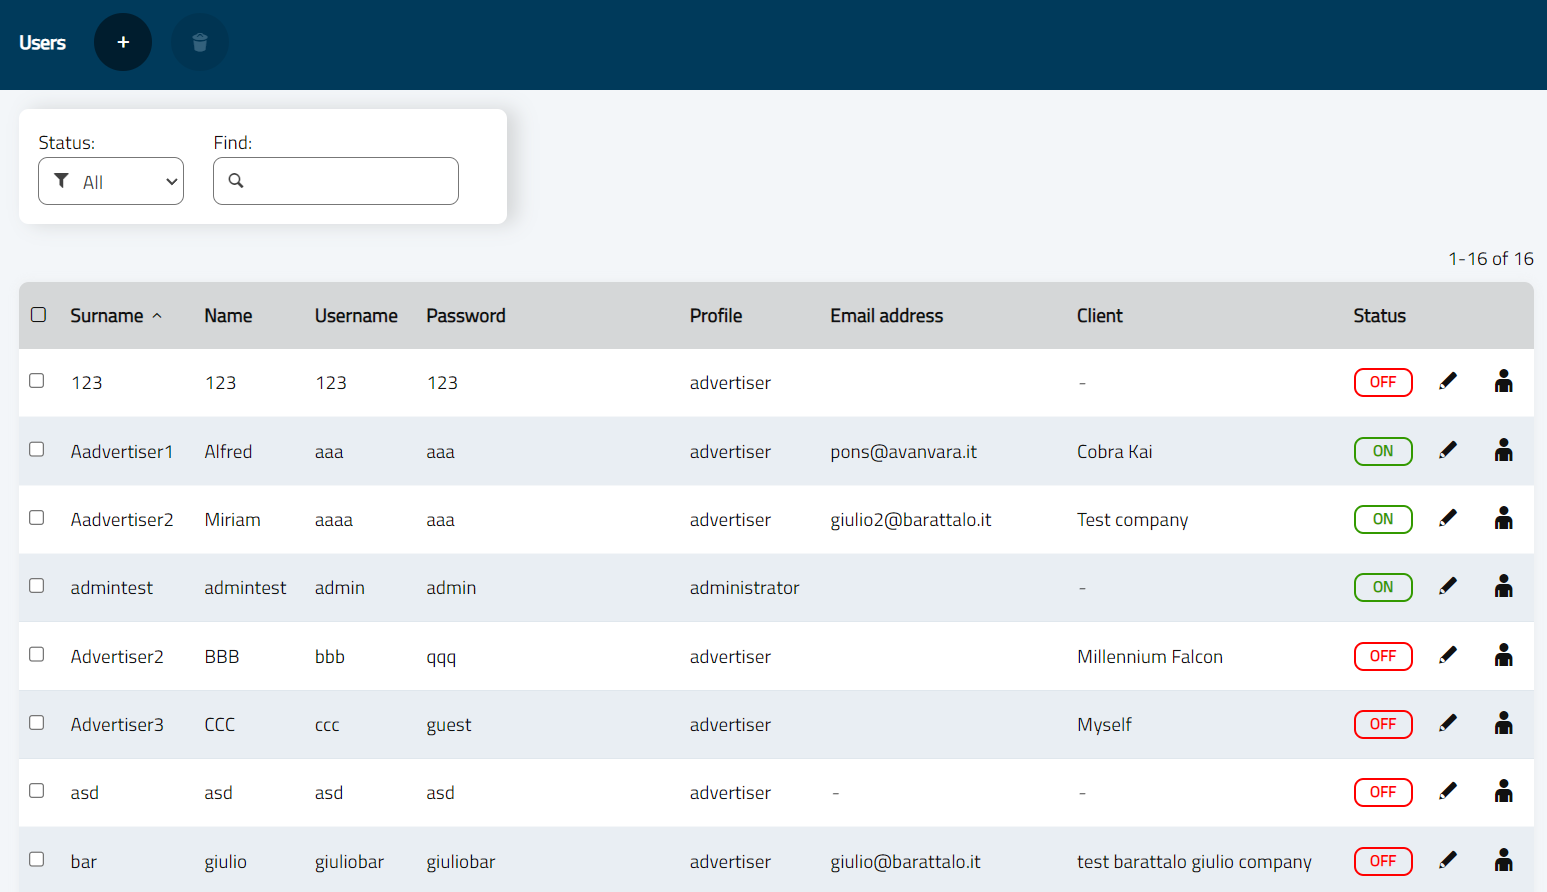
When you open the Users view in the main menu you will see this list, where you can edit/delete the existing users or you can create new users.
You can create other admins users and you can create webmasters and avertisers.
In the User list there you can click on the pencil icon to edit the user, the second icon is to edit more details and the user icon is to logout and enter again into Adadmin software as that user..
Above the list there is a button to “Add a new user” and delete the select user.
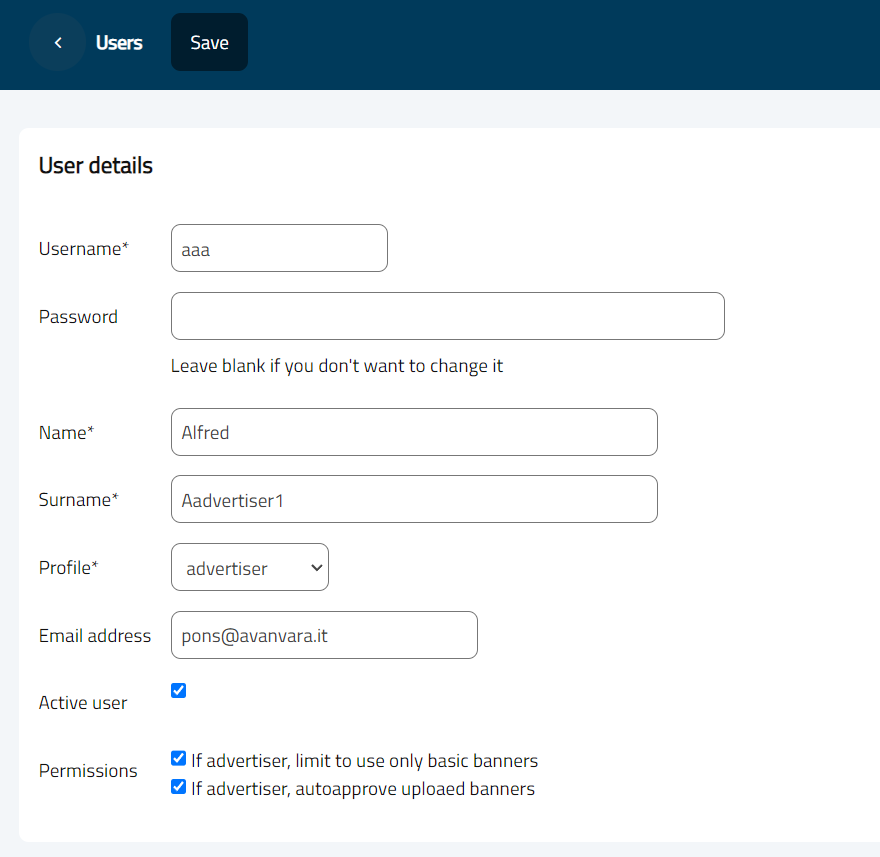
Here is the user detail view:
These are the main user details, the flag Active user lets you deactivate the user without deleting him. I will not be able to login.
When you are creating an advertiser user you can choose to check the Only basic banner permission which will limit the user to create only basic banners with just image and link.
When you are creating an advertiser user you can also choose to check the Autoappprove banner permission. With this check flagged the user banners are automatically published after the payment and don’t pass through the Pending status (which need administrator approvation to go online).
As you can see at this moment the password has not any strength check, you can type any password you want.
Since version 3.94 AdAdmin supports the selling process of ads with Paypal payments.
Since version 3.993 AdAdmin also supports payments with crypto using Coinbase service. With Coinbase users can pay with:
And you can configure your Coinbase account to automatically convert crypro to FIAT currency.
To sell banners in your AdAdmin software you need a Paypal account or a Coinbase account.
To configure Paypal, login in Paypal developer account dashboard: https://developer.paypal.com/developer/accounts/
Create an application and get your credentials: Client ID and Client Secret.
Put these settings in your AdAdmin settings in the section PAYPAL_CLIENTID and PAYPAL_SECRET.
With Paypal you can use a “sandbox” server to test the system or you can use the “live” server to sell.
Use the sandbox to make test wiithout spending real money, Paypal will give you fake accounts with fake money to perform every test you want.
To configure Coinbase, login to Coinbase commerce: https://beta.commerce.coinbase.com/
Go to your Settings page, then Security and create an API KEY and copy it to the COINBASE_API_KEY setting in the AdAdmin Settings page.
To activate payments you need to configure Paypal and/or Coinbase and set PAYMENTS to ON in the Settings page.
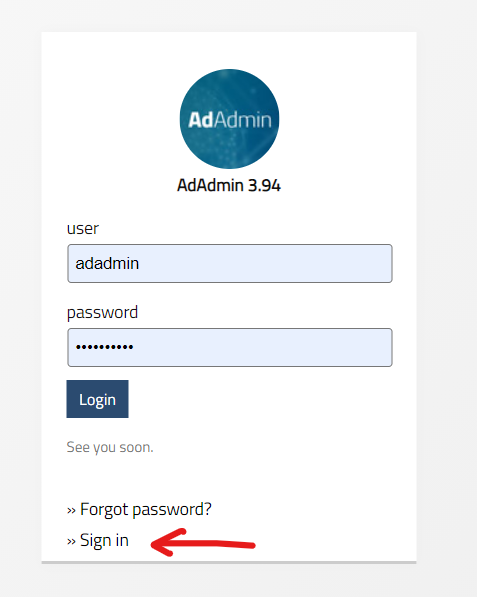
When you activate payments there will be a link to create a new user in the login page:
New users can sign in autonomously and buy ads.
You must configure some positions to be sellable, because each position isn’t automatically sellable. You need to go to positions and edit the position that you want to sell. You have to define the selling model (CPM / CPD /CPC) and price.
When payments are ON users can sign in, create a campaign and buy ads.
The process is composed of a few simple steps:
Fill in the data in the banner creation form, upoad images, insert the link...
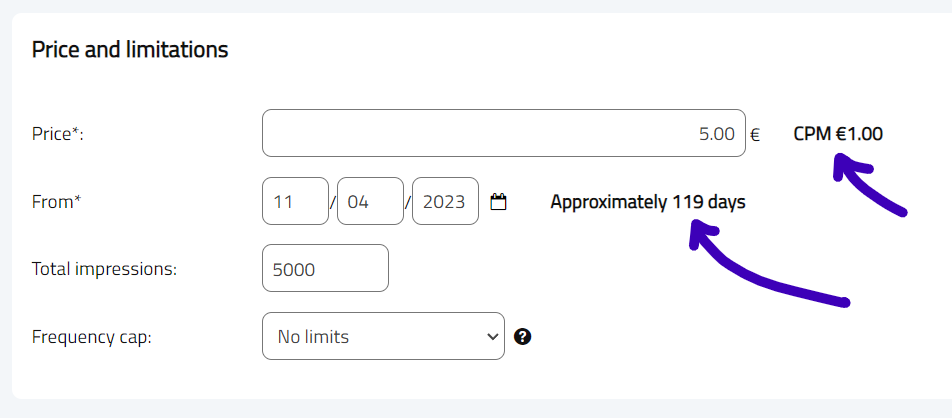
Specify the price he wants to spend.
The system calculates the views or the days (it depends on the selling model) and if it has enough data it will also show approximately the duration of the banner (for CPC and CPM).
Specify the geoip targeting (if it’s available), frequency cap and technological targeting (mobile/desktop)
The advertiser can specify also the starting date for the banner
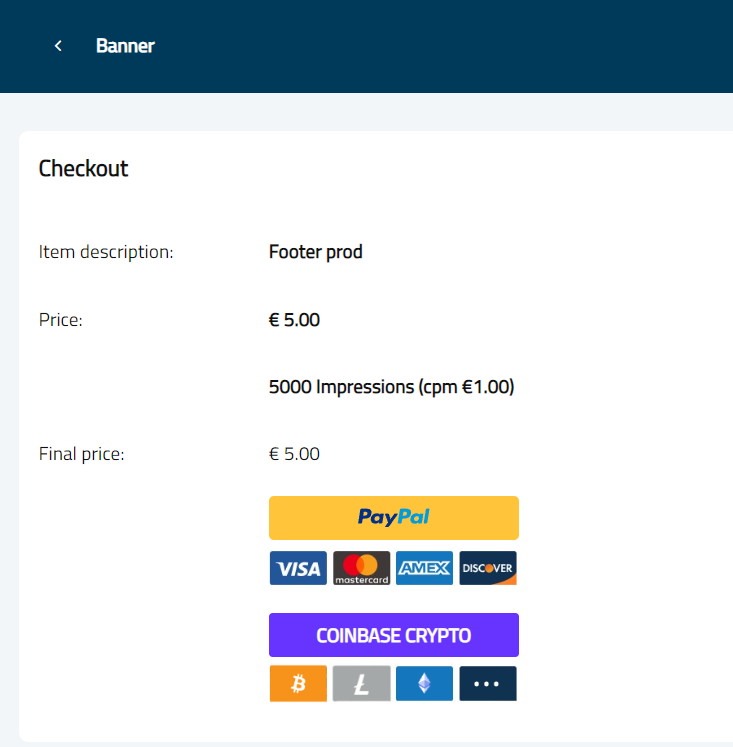
When the user clicks on the Paypal button the payment process starts on the Paypal server.
The user comes back to its banner list and the banner is saved as “Pending”.
If you have configured also Coinbase crypto payments another button appears:
By clicking on the Coinbase button the payment process starts on the Coinbase server. Since payments with crypto are not always ‘live’ and there could be a delay, banners paid with criptocurrencies are placed in a WAITING PAYMENT status.
IMPORTANT: Please, note then when you are logged in the AdAdmin software the software periodically checks to see if Coinbase has completed the transactions, but you should create a cronjob on your server to schedule a continous check every 5 minutes to the url:
https://youserver.com/amb/src/componenti/7banner/cron.php
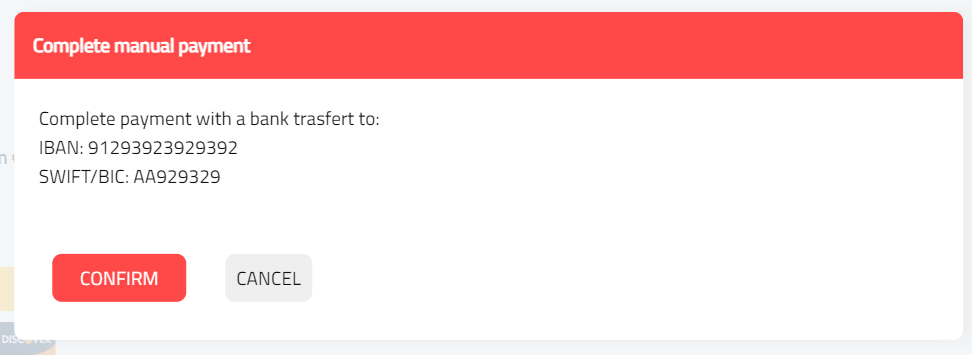
The user can also pay with manual payments outside the AdAdmin software. When he clicks the button a pop up shows to confirm the manual payment. The text displayed comes from the Settings and tells the user how to complete the payment. For example:
If the user clicks on “CONFIRM” the banner change status to “Waiting Payment” and only the administrator can confirm the payment and start serving banners.
You should check if the target link is ok for you, and if the pictures or the scripts uploaded are ok.
Since version 3.97 in AdAdmin there is the “webmaster” user profile.
A webmaster is a user created by Administrator (actually a webmaster can’t subscribe, but it must be created by administrator). The webmaster can create sites and positions.
Sites and positions will be available to Advertisers, so they can place banners on the webmaster’s sites.
Websites and webmasters are particularly useful for scenarios where an administrator allows many webmasters to sell banners through its AdAdmin installation.
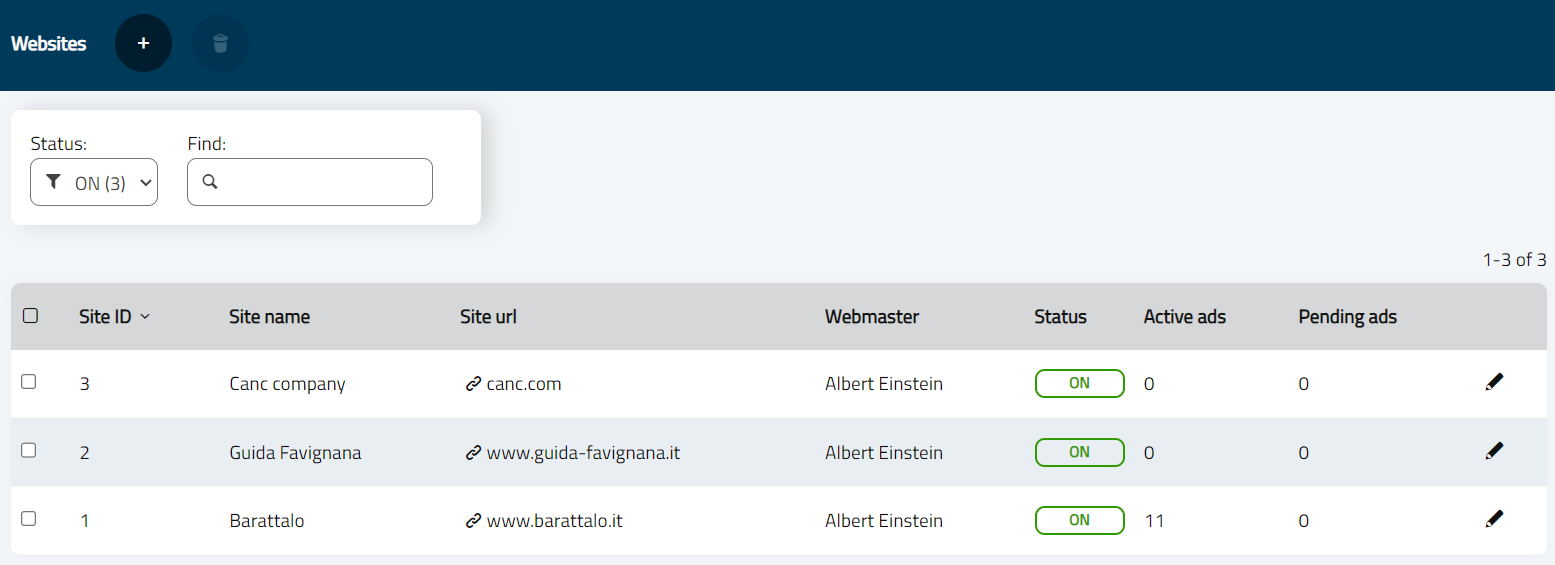
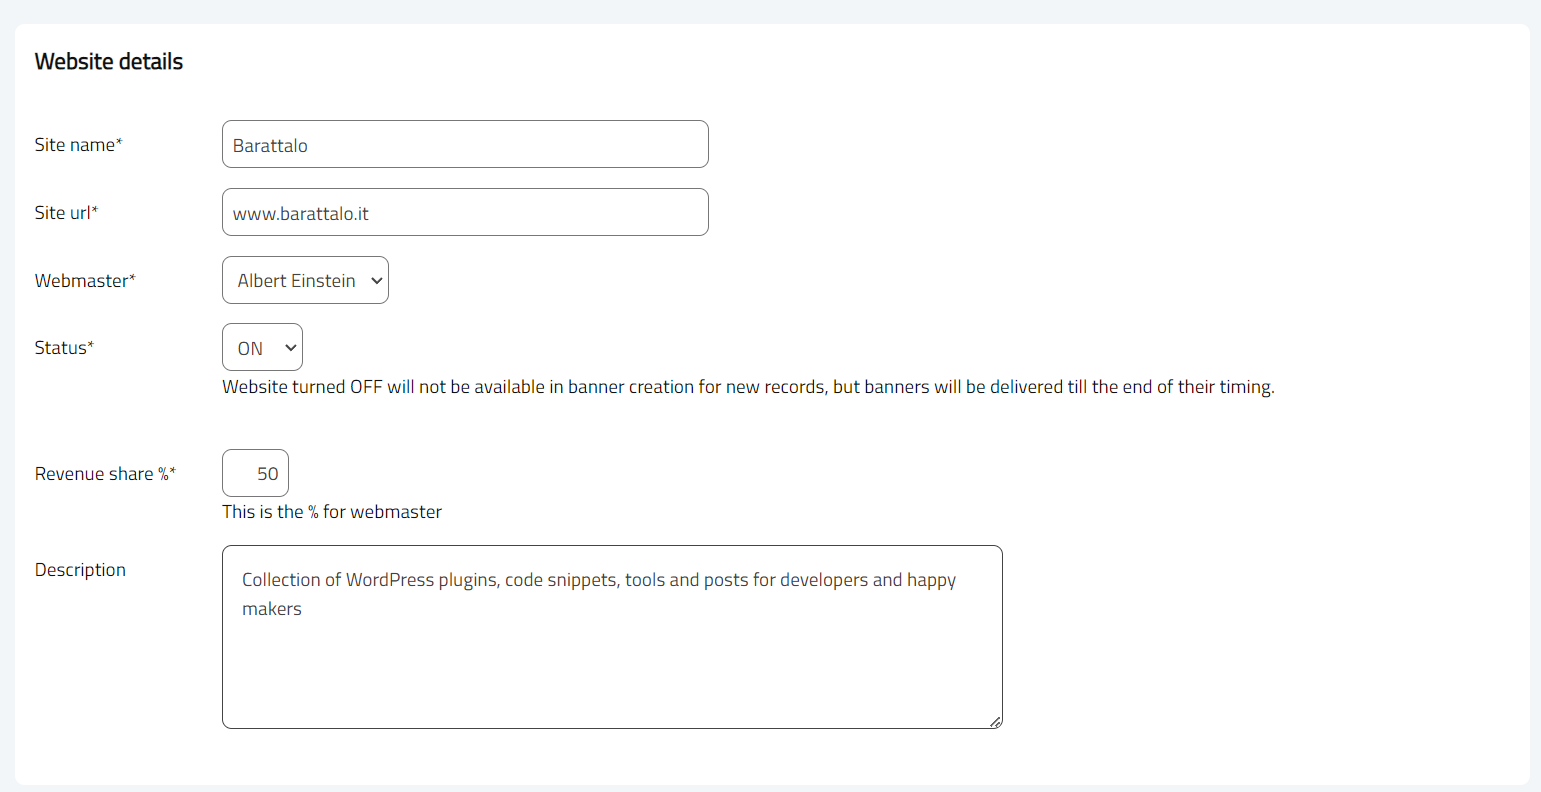
Each webmaster can add as many sites as he wants:
For each website added the Administrator can decide the percentage of the revenue share with the Webmaster.
That percentage is editable and visible only to the Administrator:
As an administrator you have to discuss the percentage of the revenue share with your webmasters and then input the decided percentage.
That value will be visible anytime an Advertiser buys a banner, AdAdmin software keeps track and shows the calculation to the webmaster (see Payments section).
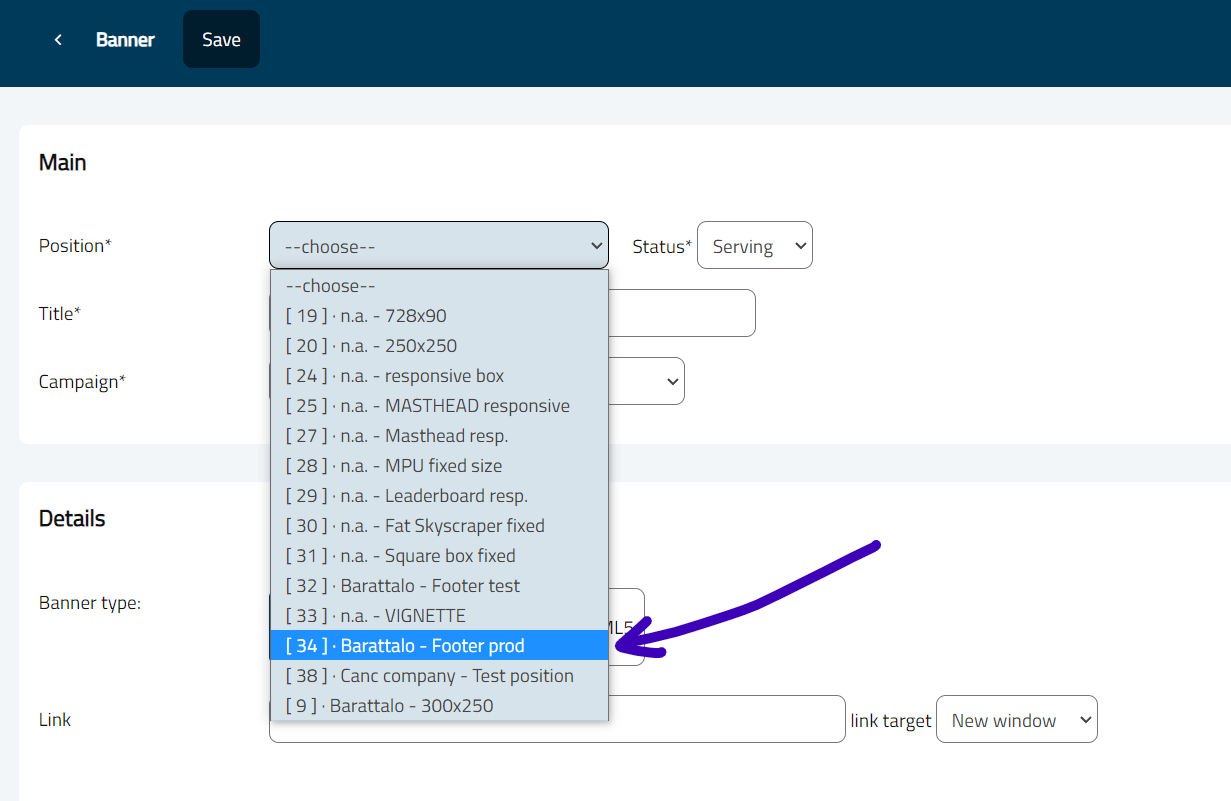
For each website the webmaster can add as many positions as he wants. The position created (same process of the Administrator that creates a position). When the webmaster create a position, that position will be available for Administrators during the creation of a banner and to Advertisers if the position is sellable:
When advertisers buy ads, they pay with Paypal and money goes to the Administrator.
Administrators have to pay their Webmasters manually, outside AdAdmin software.
The AdAdmin software tracks all the selling process in the “Payments” section, it counts the money and keeps track of the amount that Administrators must pay to their webmasters.
In the Payments section you can find the sum of the money earned by a webmaster (with its sites) and you can mark a Payment as “paid”.
I’ll repeat: these payments must be paid outside AdAdmin software.
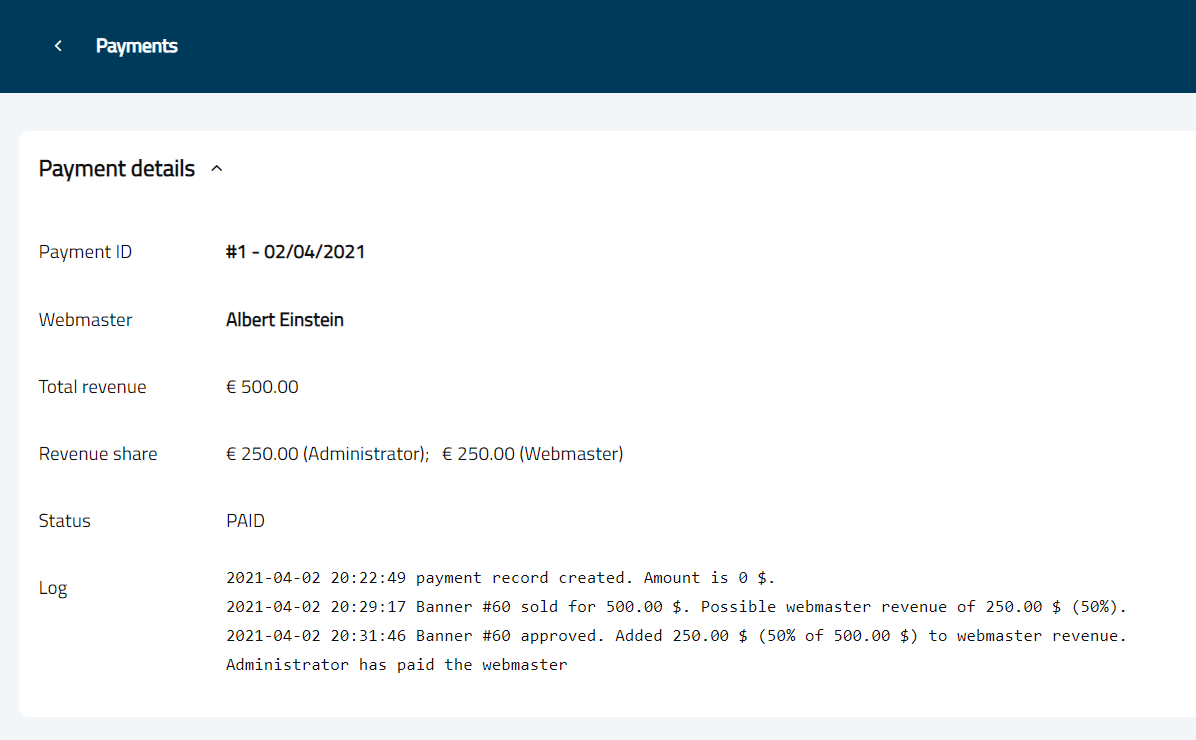
For each payment that the Administrator has to make a log is kept and it will contain all the actions that generated that amount.
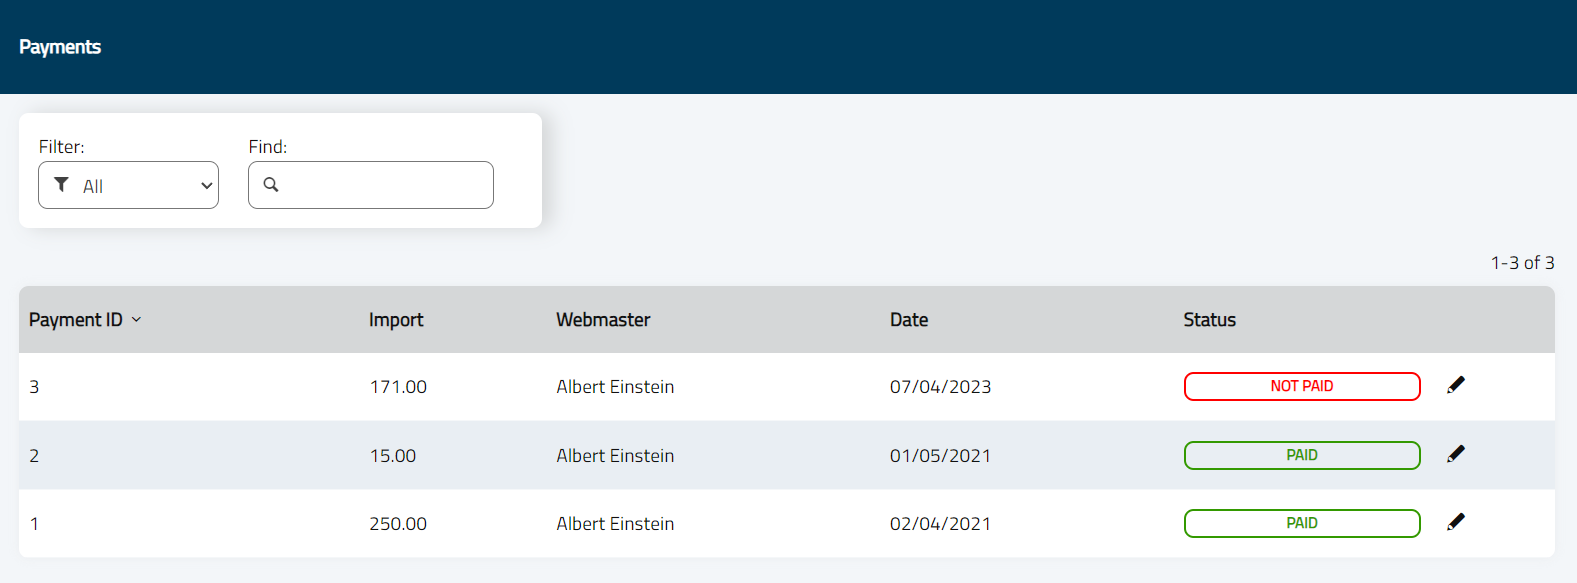
Here are a screenshot with an example:
Here are 2 payments, the first “id 1” happened on 04/02/2021 and was of 250 $.
This amount (250$) comes from 1 single sell, and the log shows it:
The second Payment of 225 $ isn’t paid yet, and comes from differents item sold, as you can see in the log:
As you can see from the log the total revenue shared with the webmaster is tracked step by step. Different revenue share percentages (defined on a single website) will be properly applied.
When an advertiser pays for a banner, money goes to the paypal account configured in the settings. When an Administrator approves a banner uploaded and paid by an Adverstiser, money is counted in the Payments log.
When Administror is ready he can pay his Webmaster (outside AdAdmin) and mark the payment as “Paid”.
This action will close the log, and an email will be sent to the webmaster to notify him that you’ve paid him.
There is one log active (not paid) for each webmaster.
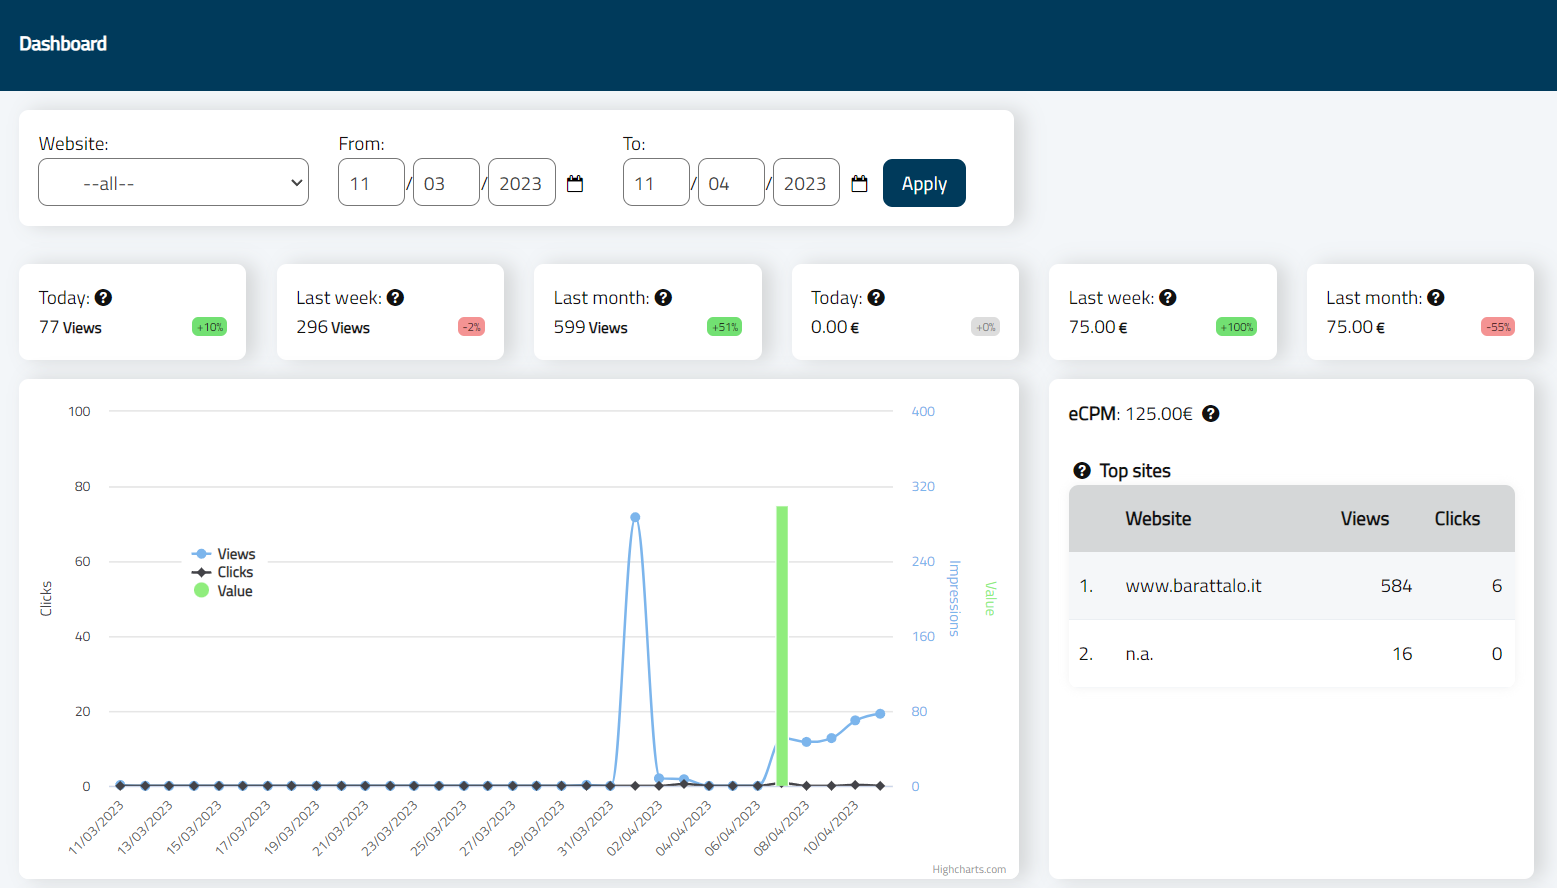
The dashboard is a panel with data collected all in one place, there are some differences with the profile of the user.
Dashboard for Webmasters and Administrators
The dashboard contains a control to filter data by date and website.
The first six blocks of data are not fitlered but they always show today, last week, last month details for views and earned money. For “Money” here is intended the amount of the transactions received today, in the last week and in the last month.
If the revenue share between Webmaster and Administrator is 50%, here you will see only 50% of the total amount.
The small number on the right indicates the variation, compared to the previous period.
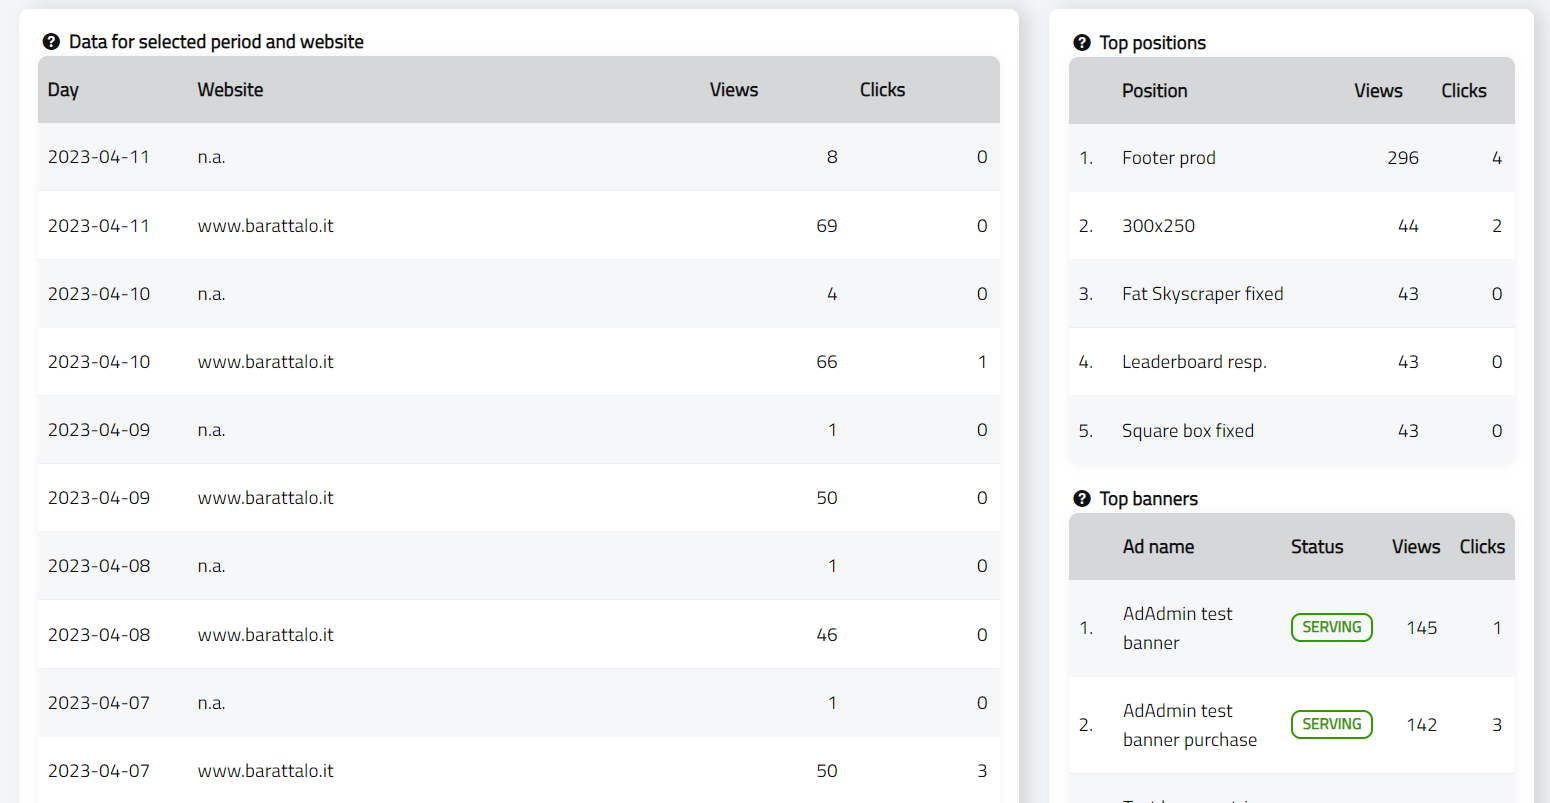
The chart and tables that follow are filtered by date and website.
The value of eCPM calculated in the table on the right is the total amount of money divided by the total number of views and multiplied by 1000.
Below in the dashboard there is also a table with data about clicks and views with the site name.
On the right you can find a top chart for the selling position with more views and a top chart for sites with more views.
The dashboard for the Advertiser is similar to the previous one, but the first six blocks contain clicks and views and not money spent.
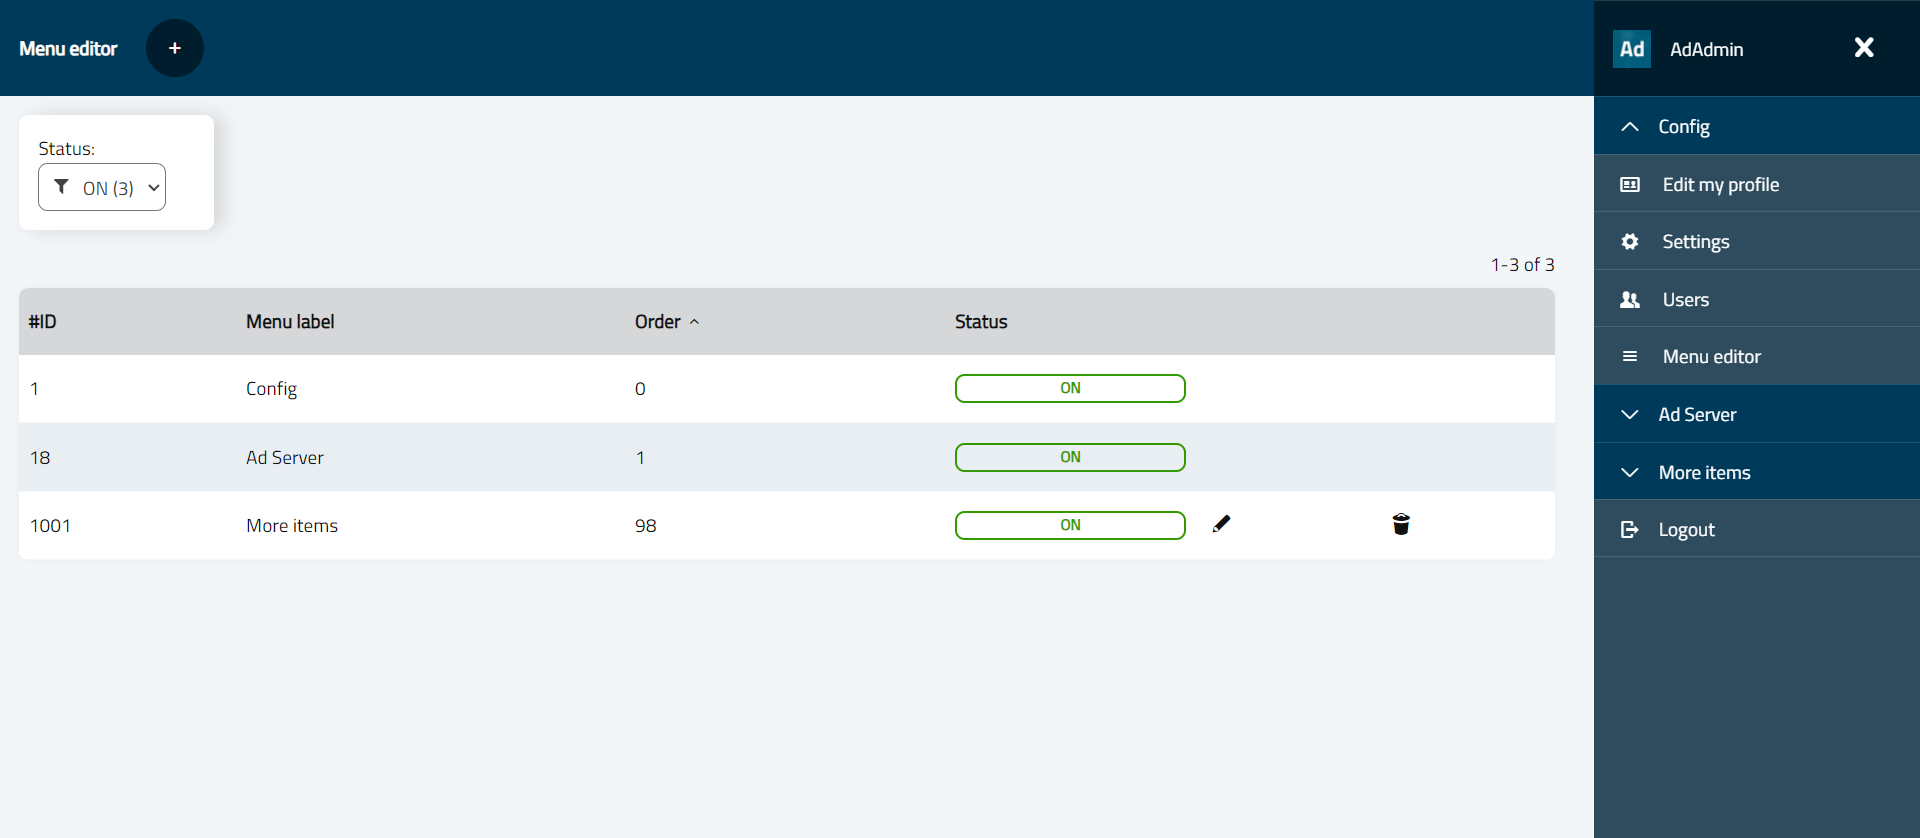
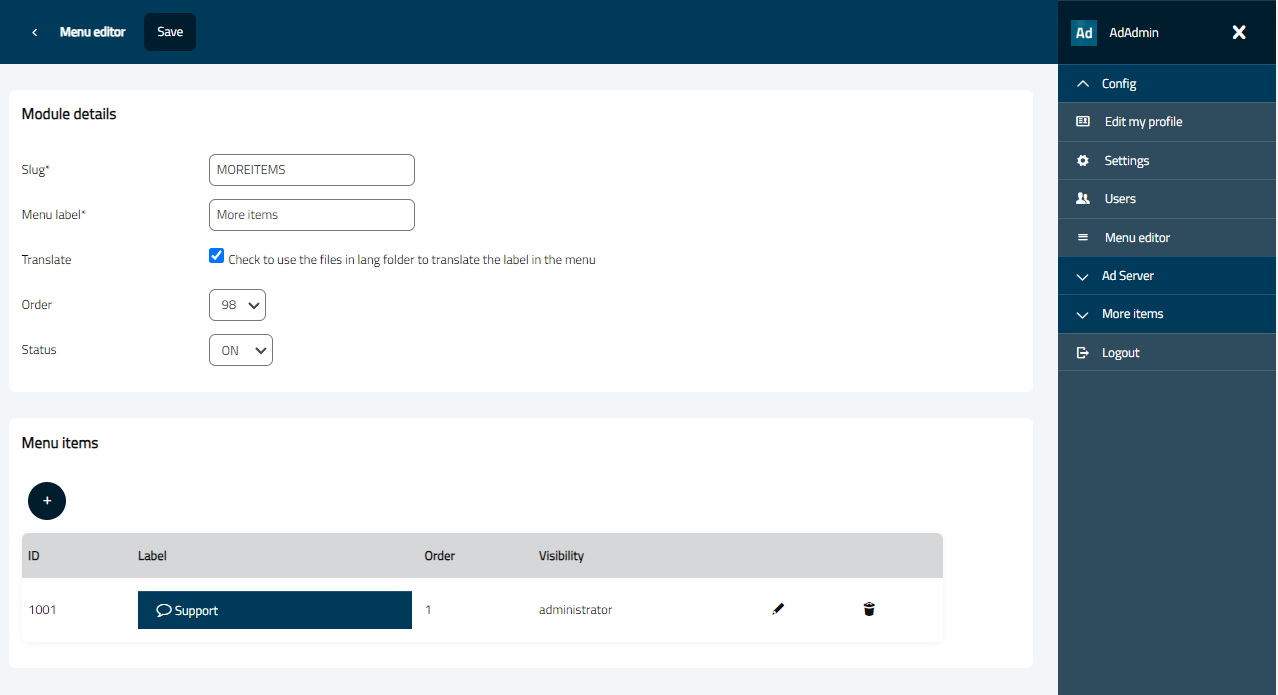
Since version 4.2 it’s available a Menu editor in Config module that allows an administrator to create a new section in Menu and add custom items in Menu.
This, for example, can be used to add a link to some information page for your Advertisers, or you can add just for Administrator a link to your database manager tool (like phpMyAdmin).
You can define “Modules” which are the item containers in the menu.
And inside a Module you can add Menu items.
You can’t modify directly Config and Ad Server, but you can create a custom Module and add commands inside it, like the More items module.
Here is the “Module” detail:
If you need to translate in multiple languages you have to mark the checkbox.
You can add items in the menu by pressing the PLUS button.
Each item can be shown to administrator, webmasters and advertisers as you prefer.
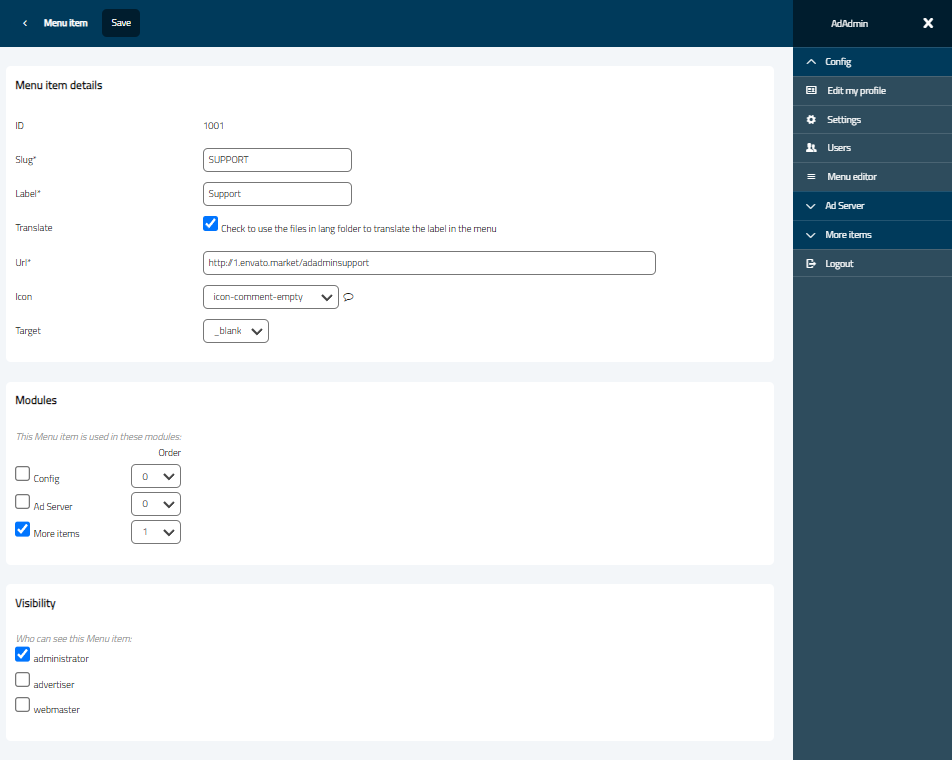
Here is the screen for the menu edit option:
The “Modules” section let you add an item to a Module. You can also place the item in different Modules.
AdAdmin is available with two languages file “English” and “Italian”.
To change the default language open the pons.settings.php file in AdAdmin main folder and change the line with:
define("LANGUAGEFILE",'en.lang.txt');
Each user can manually change the language for its session in Settings > Edit my profile
Available languages files pre-installed are en.lang.txt and it.lang.txt.
If you want to create a new language file you can save a copy of the English file, open it with a text editor, it’s a CSV file, the first column is the label and the second column is the translation in your language. Open it file to better understand.
If you want to share your own language file to help other users you can upload it in github project page:
https://github.com/giuliopons/adadmin
AdAdmin supports theme customization, especially for the Login page which can be modified to fit your needs.
Follow these instructions to customize your login page:
https://github.com/giuliopons/adadmin/discussions/33
You can allow users from another application on the same server to enter the AdAdmim software, now a Custom Login PHP class is available and ready to use to integrate your Application with AdAdmin.
Follow these instructions to let your users in:
https://github.com/giuliopons/adadmin/discussions/49
Do you have a feature request?
Please, refer to Github project page for discussion of new features:
https://github.com/giuliopons/adadmin
Where is version history?
Please refer to the CodeCanyon page to see the complete list of versions and features.
https://1.envato.market/adadmin
When you buy your own license from CodeCanyon store (here is the AdAdmin page:https://1.envato.market/adadmin ) you will also receive future updates to the software for the period you choose.
Since version 3.994 the update process is extremely simple.
Just copy all files over the old ones and go to the url of your installation.
Update process will run automatically.
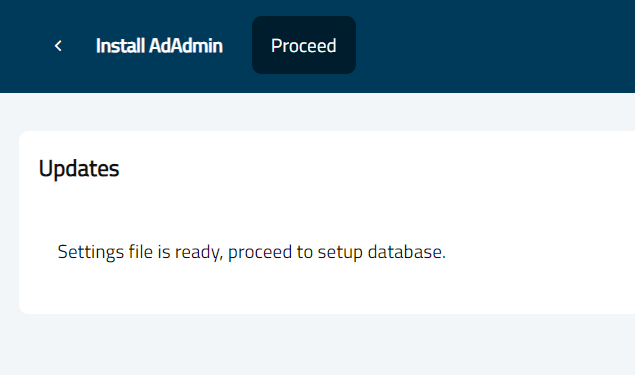
Click on proceed to run database installation queries.
You will see this screen at every update we will be distributing on CodeCanyon.